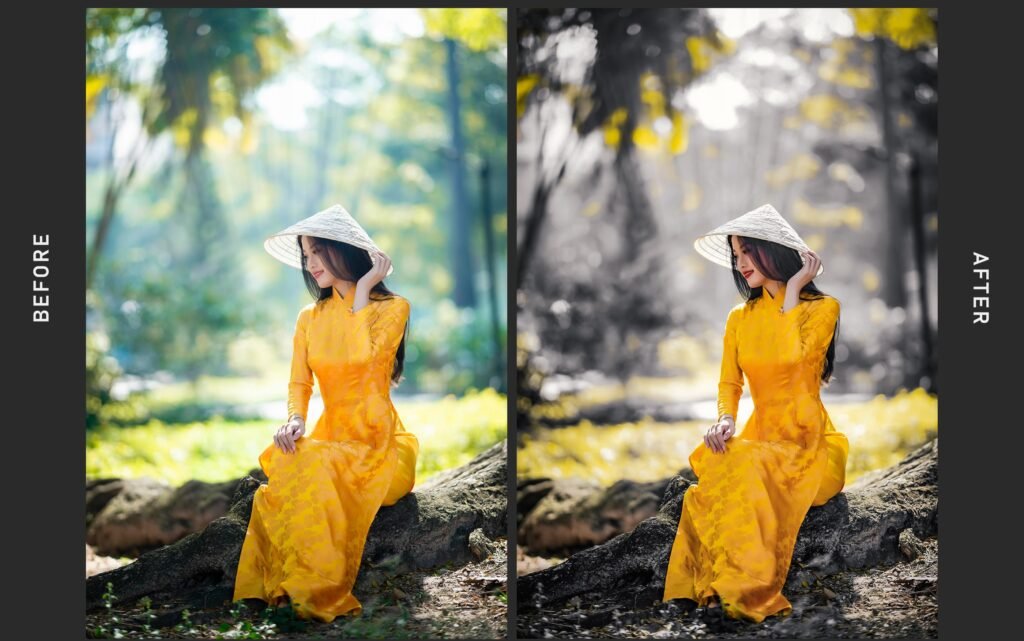
To edit the background of a photo, you can use photo editing software like Adobe Photoshop, GIMP, or online tools like Canva or Pixlr. The process typically involves selecting the background using tools like the Magic Wand or Lasso tool, then deleting or replacing it with a new background. You can also use the masking technique to refine the edges for a more natural look. Adjusting the lighting, colors, and shadows can help blend the new background with the main subject seamlessly. Remember to save your work in a high-quality format like PNG to preserve the transparency of the background if needed. Experiment with different tools and techniques to achieve the desired result and create visually stunning images.
Adobe Photoshop (Desktop):
Adobe Photoshop, an industry-standard photo editing software, empowers users with a comprehensive suite of tools for versatile and intricate edits. When it comes to background editing, its robust features provide unparalleled control over the process. From precise selection tools to advanced layering capabilities, Photoshop stands as a go-to choice for professionals and enthusiasts seeking professional-grade edits.
- Portrait Backgrounds: Adobe Photoshop excels in refining portrait backgrounds, allowing users to create a polished and professional look for their subjects.
- Nature Shots: For nature shots, Photoshop’s background removal or replacement capabilities enable users to highlight subjects against complementary or thematic backgrounds.
- Product Photography Backgrounds: Photoshop is ideal for enhancing product images by isolating the product and adjusting the background, ensuring a clean and professional presentation.
- Event Photography: Whether it’s a wedding, party, or corporate event, Photoshop enables users to enhance event photos by refining backgrounds and emphasizing key elements.
- Architectural Photography: Architectural photos often require meticulous editing. Photoshop’s tools allow users to clean up backgrounds, adjust perspectives, and showcase architectural details effectively.
- Social Media Posts: Photoshop is well-suited for creating captivating backgrounds for social media posts, ensuring that your content stands out on platforms like Instagram, Facebook, or Twitter.
- Travel Photography: When editing travel photos, Photoshop’s background editing features come in handy for isolating subjects against picturesque or iconic backdrops.
- Artistic Compositions: For users aiming to create artistic compositions, Photoshop offers the flexibility to experiment with background removal, replacement, and artistic effects.
Detail Step-by-Step Guide:
- Step 1: Open Your Image: Launch Adobe Photoshop and open the image you want to edit.
- Step 2: Access Background Removal Tool: Navigate to the “Select and Mask” feature, found in the “Select” menu. This tool provides a range of options for background editing.
- Step 3: Select Subject and Refine Edges: Use the various selection tools to outline the subject. Refine edges using the tools within “Select and Mask” for intricate details like hair.
- Step 4: Remove or Replace Background: Once your subject is selected, delete the background or replace it with a new one using layers.
- Step 5: Adjust Settings for Realism: Fine-tune settings like transparency and color adjustments to ensure a realistic blend between the subject and the new background.
- Step 6: Save Your Edited Image: Save your edited image in the desired format, preserving layers for future adjustments.
Tips for Effective Background Editing:
- Experiment with Blending Modes: Explore different blending modes to achieve unique effects when combining layers. Modes like Multiply or Overlay can enhance the overall atmosphere.
- Utilize Adjustment Layers: Employ adjustment layers for non-destructive editing. This allows you to make changes without altering the original image.
- Attention to Lighting: Pay close attention to the lighting in both the original image and the new background for a realistic and cohesive result.
By following this guide, users can leverage Adobe Photoshop’s extensive capabilities for background editing across a variety of picture types, ensuring creative and impactful results.
GIMP (Desktop) Tool Overview:
GIMP, a powerful open-source image editing software, provides users with a wide array of tools for professional-level edits. When it comes to background editing, GIMP’s versatility shines through. From advanced selection tools to layer manipulation, GIMP offers a robust platform for users looking to refine and replace backgrounds with precision.
Editing Specific Types of Pictures:
- Portrait Backgrounds: GIMP excels in portrait background editing, enabling users to create clean and professional looks by isolating subjects.
- Nature Shots: Nature photography often requires seamless background adjustments. GIMP’s features allow users to enhance nature shots by refining or replacing backgrounds.
- Artistic Compositions: For users seeking artistic compositions, GIMP’s diverse tools provide the flexibility to experiment with background removal, replacement, and artistic effects.
- Product Photography Backgrounds: GIMP is suitable for enhancing product images by isolating the product and adjusting backgrounds, ensuring a polished and appealing presentation.
- Event Photography: GIMP facilitates effective background editing for event photos, allowing users to emphasize key elements and enhance overall aesthetics.
- Social Media Posts: GIMP’s capabilities extend to creating captivating backgrounds for social media posts, ensuring visually appealing content across various platforms.
- When editing travel photos, GIMP provides tools for isolating subjects against scenic or thematic backgrounds, enhancing the overall impact.
Detail Step-by-Step Guide:
- Step 1: Open Your Image: Launch GIMP and open the image you want to edit.
- Step 2: Select Background Removal Tool: Utilize the “Foreground Select Tool” or other selection tools to outline the subject and separate it from the background.
- Step 3: Refine Edges and Selection: Refine edges using GIMP’s edge-smoothing tools for a seamless transition. Adjust the selection as needed to capture intricate details.
- Step 4: Remove or Replace Background: Delete the background or replace it with a new one using GIMP’s layer manipulation features.
- Step 5: Adjust Settings for Realism: Fine-tune settings such as transparency and color adjustments to achieve a realistic blend between the subject and the new background.
- Step 6: Save Your Edited Image: Save the edited image in the desired format, preserving layers for future adjustments.
Tips for Effective Background Editing:
- Experiment with Filters and Effects: GIMP provides a variety of filters and effects. Experiment with these to add creative elements or enhance the overall atmosphere of your image.
- Use Layers for Non-Destructive Editing: Leverage GIMP’s layer functionality for non-destructive editing. This allows you to make changes without altering the original image.
- Attention to Detail: Pay attention to details during the editing process, ensuring a cohesive and professional result. Zoom in to refine intricate areas.
- By following this guide, users can harness GIMP’s capabilities for background editing across a range of picture types, achieving professional and visually striking results.
Canva (Web/Mobile) Tool Overview:
Canva stands out as a user-friendly and versatile design platform, accessible both on the web and mobile devices. While renowned for graphic design, Canva also offers robust tools for background editing. With an intuitive interface and a vast library of elements, Canva empowers users to create stunning visuals effortlessly.
Editing Specific Types of Pictures:
- Social Media Posts: Canva is well-suited for creating captivating backgrounds for social media posts, ensuring eye-catching content for platforms like Instagram, Facebook, or Twitter.
- Quote Graphics: When crafting quote graphics, Canva’s background editing features allow users to customize backgrounds with ease, enhancing the visual appeal of text-based content.
- Event Invitations: For event invitations, Canva enables users to personalize backgrounds, adding thematic elements to create invitations that stand out.
- Blog Graphics: Canva’s background editing tools cater to bloggers, offering the flexibility to design visually appealing blog graphics with customized backgrounds.
- Presentations: Canva is a valuable tool for presentation design. Users can edit backgrounds to complement the content and maintain a cohesive visual theme.
- Customizing Templates: Canva’s vast template library includes designs for various purposes. Users can edit backgrounds within templates to align with their brand or personal style.
Detail Step-by-Step Guide:
- Step 1: Access Canva and Choose a Design Type: Log in to Canva on the web or open the mobile app. Choose the type of design you want to create, or start with a blank canvas.
- Step 2: Select Background Editing Options: Navigate to the “Elements” tab and choose “Background” to access Canva’s background editing features.
- Step 3: Customize Background: Customize the background by changing colors, adding gradients, or uploading your own images. Experiment with transparency settings for layered effects.
- Step 4: Add Elements and Text: Enhance your design by adding elements, illustrations, or text. Canva provides a variety of elements to complement your background.
- Step 5: Preview and Adjust: Preview your design to ensure the background complements the overall composition. Make adjustments as needed.
- Step 6: Save or Download: Save your design within Canva for future edits or download it in your preferred format.
Tips for Effective Background Editing:
- Utilize Canva’s Stock Library: Explore Canva’s extensive stock library for high-quality images and illustrations that can enhance your background.
- Consistent Branding: Maintain consistent branding by using colors and elements that align with your brand identity across different designs.
- Experiment with Effects: Canva offers effects like blurring and fading. Experiment with these to add depth and creativity to your backgrounds.
- By following this guide, users can leverage Canva’s intuitive platform for background editing, creating visually appealing designs tailored to their specific needs and preferences.
Pixlr (Web/Mobile) Tool Overview
Pixlr is a versatile photo editing tool available both on the web and as a mobile app. Known for its user-friendly interface and powerful editing capabilities, Pixlr offers a range of tools for enhancing and customizing images, making it a valuable resource for background editing.
- Instagram Photos: Pixlr is well-suited for editing backgrounds in Instagram photos, allowing users to enhance the visual appeal of their images for social media sharing.
- Collages and Montages: For creating collages or montages, Pixlr provides tools for seamless background editing, enabling users to blend multiple images cohesively.
- Profile Pictures: When editing profile pictures for various platforms, Pixlr’s features allow users to customize backgrounds to match personal or brand aesthetics.
- Product Photography: Pixlr is suitable for product photography, providing the tools needed to refine or replace backgrounds for a professional and polished look.
- Holiday and Event Photos: Edit backgrounds in holiday or event photos with Pixlr, enhancing the overall atmosphere and creating memorable visuals.
- Creating Memes: For users interested in creating memes, Pixlr’s background editing capabilities can add humor and creativity to meme designs.
Detail Step-by-Step Guide:
- Step 1: Access Pixlr and Open Image: Launch Pixlr on the web or open the mobile app. Open the image you want to edit.
- Step 2: Select Background Editing Tools: Explore Pixlr’s editing toolbar to find background editing tools. Look for features like the Magic Wand tool for quick selections.
- Step 3: Make Background Selection: Use the selected tool to make a precise selection of the background you want to edit. Adjust the tolerance or sensitivity for accurate selections.
- Step 4: Remove or Replace Background: Delete the selected background or replace it with a new one using Pixlr’s layering and blending options.
- Step 5: Adjust Settings for Realism: Fine-tune settings such as transparency and color adjustments to ensure a natural blend between the subject and the new background.
- Step 6: Save Your Edited Image: Save your edited image in the desired format. Pixlr typically allows users to save in common formats like JPEG or PNG.
Tips for Effective Background Editing:
- Experiment with Filters and Overlays: Pixlr offers a variety of filters and overlays. Experiment with these to add creative elements to your backgrounds.
- Precision in Selection: Take your time with selections, especially around intricate areas. Pixlr’s zoom functionality can aid in achieving precise edits.
- Backup Original Images: Before making extensive edits, consider saving a copy of the original image. This ensures you have the option to revert to the original if needed.
By following this guide, users can leverage Pixlr’s powerful features for background editing, enhancing various types of pictures with creativity and precision.
Fotor (Web/Mobile) Tool Overview:
Fotor is a user-friendly photo editing platform available both on the web and as a mobile app. Known for its simplicity and a wide range of editing features, Fotor is an excellent choice for users looking to enhance and customize their images, including background editing.
- Facebook Cover Photos: Fotor is well-suited for editing background images for Facebook cover photos, allowing users to create visually appealing and personalized covers.
- Pinterest Graphics: When designing graphics for Pinterest, Fotor’s background editing tools enable users to customize backgrounds to align with their brand or style.
- Professional Headshots: Edit backgrounds in professional headshots using Fotor to create a polished and cohesive look for professional profiles.
- YouTube Thumbnails: For creating eye-catching YouTube thumbnails, Fotor provides features to enhance backgrounds and make thumbnails stand out.
- Invitations and Greeting Cards: Customize backgrounds for invitations or greeting cards using Fotor, adding a personal touch to special occasions.
- Creating Infographics: Fotor’s versatility extends to creating infographics, allowing users to edit backgrounds and design engaging visual content.
Detail Step-by-Step Guide:
- Step 1: Access Fotor and Open Image: Launch Fotor on the web or open the mobile app. Open the image you want to edit.
- Step 2: Choose Background Editing Feature: Navigate to the background editing feature within Fotor. This may be located in the editing toolbar or a dedicated section for background adjustments.
- Step 3: Select Background Area: Use Fotor’s selection tools to choose the area of the background you want to edit. Adjust the selection for precision.
- Step 4: Remove or Replace Background: Delete the selected background or replace it with a new one using Fotor’s editing options. Explore additional features like overlays for creative effects.
- Step 5: Adjust Settings for Realism: Fine-tune settings such as transparency, color adjustments, and blending modes to achieve a realistic blend between the subject and the new background.
- Step 6: Save Your Edited Image: Save your edited image within Fotor or download it in your preferred format, such as JPEG or PNG.
Tips for Effective Background Editing:
- Utilize Fotor’s Templates: Explore Fotor’s template library for pre-designed backgrounds and layouts that can serve as a starting point for your edits.
- Experiment with Text and Elements: Enhance your background by adding text or design elements using Fotor’s text and sticker features.
- Collaborate and Share: Fotor often includes collaboration features. Collaborate on designs and easily share your edited images with others.
By following this guide, users can effectively use Fotor’s features for background editing across various types of pictures, creating visually striking and customized images.
Snapseed (Mobile) Tool Overview
Snapseed is a powerful mobile photo editing app developed by Google. Known for its user-friendly interface and advanced editing features, Snapseed provides a wide array of tools for enhancing images, including background editing options.
- Portrait Photography: Snapseed is ideal for editing backgrounds in portrait photos, allowing users to refine and customize backgrounds to complement the subject.
- Nature and Landscape Shots: Enhance nature and landscape shots by using Snapseed’s background editing tools to adjust colors, contrast, and overall atmosphere.
- Street Photography: For street photography, Snapseed’s features enable users to fine-tune backgrounds to highlight key elements and enhance the overall street vibe.
- Food Photography: Snapseed is suitable for editing backgrounds in food photos, adding creative touches or adjusting colors to make the food stand out.
- Travel Photography: Customize backgrounds in travel photos with Snapseed, creating visually appealing compositions that capture the essence of different locations.
- Social Media Posts: When creating visuals for social media posts, Snapseed provides tools to edit backgrounds, ensuring eye-catching content for platforms like Instagram or Twitter.
Detail Step-by-Step Guide:
- Step 1: Open Image in Snapseed: Launch Snapseed on your mobile device and open the image you want to edit.
- Step 2: Access Tools and Filters: Navigate to the “Tools” section and explore filters and editing tools. Look for options that specifically allow background adjustments.
- Step 3: Select Background Editing Tool: Choose the appropriate tool for background editing. Snapseed often includes features like “Selective,” “Brush,” or “Double Exposure” for targeted edits.
- Step 4: Make Background Adjustments: Use the selected tool to make adjustments to the background. This may include changing colors, adding effects, or enhancing overall clarity.
- Step 5: Refine Edges and Details: Pay attention to edges and details within the background. Snapseed offers precision tools to refine edits and ensure a seamless blend.
- Step 6: Save Your Edited Image: Save your edited image within Snapseed or export it to your device. Choose the desired format and resolution.
Tips for Effective Background Editing:
- Experiment with Stacks: Snapseed allows users to create stacks of edits. Experiment with different stacks to find the combination that works best for your background.
- Fine-Tune Colors and Saturation: Adjust colors and saturation in the background to achieve the desired mood or atmosphere.
- Utilize Perspective Tools: If applicable, use perspective correction tools in Snapseed to align background elements for a polished look.
By following this guide, users can leverage Snapseed’s mobile editing capabilities to enhance and customize backgrounds in various types of pictures, achieving professional and visually appealing results.
Adobe Photoshop Express Tool
Adobe Photoshop Express is a mobile photo editing app developed by Adobe. While not as feature-rich as the desktop version, Photoshop Express provides powerful tools for on-the-go editing, including options for background adjustments.
Editing Specific Types of Pictures:
- Portrait Photography: Photoshop Express is well-suited for editing backgrounds in portrait photos, allowing users to refine and enhance the backdrop to complement the subject.
- Social Media Posts: Customize backgrounds for social media posts using Photoshop Express. This ensures eye-catching visuals for platforms like Instagram, Facebook, or Twitter.
- Product Photography: Enhance product images by adjusting backgrounds with Photoshop Express, creating a clean and professional presentation for e-commerce or marketing.
- Travel Photography: Tailor backgrounds in travel photos with Photoshop Express, adding creative touches or adjusting colors to capture the essence of different locations.
- Event Photography: Edit backgrounds in event photos to emphasize key elements and enhance overall aesthetics, ensuring memorable visuals.
- Collages and Compositions: Create collages or artistic compositions with Photoshop Express by manipulating backgrounds to achieve the desired visual impact.
Detail Step-by-Step Guide:
- Step 1: Open Image in Photoshop Express: Launch Photoshop Express on your mobile device and open the image you want to edit.
- Step 2: Access Background Editing Tools: Navigate to the editing tools or effects section. Look for features specifically designed for background adjustments.
- Step 3: Choose Background Editing Option: Select the appropriate tool for background editing. Photoshop Express often includes options like “Cutout,” “Adjust Background,” or “Remove Background.”
- Step 4: Make Background Adjustments: Use the selected tool to make adjustments to the background. This may include changing colors, adding effects, or enhancing overall clarity.
- Step 5: Refine Edges and Details: Pay attention to edges and details within the background. Use precision tools to refine edits and ensure a seamless blend with the subject.
- Step 6: Save Your Edited Image: Save your edited image within Photoshop Express or export it to your device. Choose the desired format and resolution.
Tips for Effective Background Editing:
- Experiment with Filters and Overlays: Explore the variety of filters and overlays available in Photoshop Express. Experiment with these to add creative elements to your backgrounds.
- Utilize Adjustment Tools: Take advantage of adjustment tools like brightness, contrast, and saturation to fine-tune the overall appearance of the background.
- Save Originals: Consider saving a copy of the original image before extensive edits. This allows you to revert to the original if needed.
By following this guide, users can efficiently use Adobe Photoshop Express to edit backgrounds in various types of pictures, achieving professional and visually appealing results directly from their mobile devices.
PhotoScape X (Desktop) Tool Overview
PhotoScape X is a feature-rich desktop photo editing software known for its user-friendly interface and a wide range of editing tools. It provides users with the capability to edit backgrounds, offering diverse options for creative adjustments and enhancements.
Editing Specific Types of Pictures
- Family Portraits: PhotoScape X is well-suited for family portraits, enabling users to customize backgrounds to create cohesive and visually appealing family photos.
- Wedding Photography: Enhance wedding photos by editing backgrounds with PhotoScape X. Adjust colors, add effects, or replace backgrounds for a polished and romantic look.
- Artistic Compositions: For users interested in creating artistic compositions, PhotoScape X provides tools for background manipulation, allowing for creative and unique visual expressions.
- Product Photography: Optimize product images by adjusting backgrounds with PhotoScape X, ensuring clean and professional presentations for e-commerce or marketing.
- Macro Photography: Edit backgrounds in macro photos to highlight intricate details. PhotoScape X’s tools allow for precise adjustments, enhancing the overall impact of macro shots.
- Creating Photo Collages: Use PhotoScape X for creating photo collages, manipulating backgrounds to achieve seamless and visually appealing compositions.
Detail Step-by-Step Guide:
- Step 1: Open Image in PhotoScape X: Launch PhotoScape X on your desktop and open the image you want to edit.
- Step 2: Access Background Editing Tools: Navigate to the editing tools or effects section. Look for options such as “Cut Out,” “Clone Stamp,” or “Background Changer.”
- Step 3: Choose Background Editing Option: Select the appropriate tool for background editing based on your requirements. PhotoScape X provides various options for different editing needs.
- Step 4: Make Background Adjustments: Utilize the selected tool to make adjustments to the background. This may involve cutting out elements, cloning areas, or replacing the background entirely.
- Step 5: Refine Edges and Details: Pay attention to edges and intricate details within the background. PhotoScape X offers tools to refine edges and ensure a seamless integration with the subject.
- Step 6: Save Your Edited Image: Save your edited image within PhotoScape X, ensuring the preservation of layers for future adjustments. Export the final image in your preferred format.
Tips for Effective Background Editing:
- Experiment with Filters and Effects: PhotoScape X provides a variety of filters and effects. Experiment with these to add creative elements or enhance the overall atmosphere of your background.
- Use Layers for Non-Destructive Editing: Leverage PhotoScape X’s layer functionality for non-destructive editing. This allows you to make changes without altering the original image.
- Attention to Lighting: Pay attention to lighting in both the subject and background. Adjustments to brightness and contrast can contribute to a realistic and well-blended result.
By following this guide, users can utilize PhotoScape X’s powerful desktop editing capabilities to edit backgrounds in various types of pictures, achieving professional and visually appealing results.
Remove.BG (Web/Mobile) Tool Overview:
Remove.BG is a specialized online tool dedicated to automatically removing backgrounds from images. It simplifies the process, making it easy for users to isolate subjects from their backgrounds with just a few clicks.
Editing Specific Types of Pictures:
- Profile Pictures: Remove.BG is ideal for creating clean and professional-looking profile pictures by swiftly removing the background and focusing on the subject.
- Product Photography: Optimize product images by using Remove.BG to eliminate backgrounds, resulting in clear and isolated product visuals suitable for e-commerce platforms.
- Portrait Photography: Enhance portrait photos by removing distracting backgrounds, allowing the subject to stand out prominently with a simplified and focused composition.
- Social Media Posts: Streamline social media posts by using Remove.BG to remove backgrounds, ensuring that the subject takes center stage in visually appealing posts.
- Custom Graphics and Designs: Create custom graphics and designs by easily removing backgrounds with Remove.BG, enabling users to build compositions with transparent elements.
Detail Step-by-Step Guide:
- Step 1: Upload Image to Remove.BG: Visit the Remove.BG website on your web browser or use the mobile app. Upload the image you want to edit by either dragging and dropping or selecting from your device.
- Step 2: Automatic Background Removal: Remove.BG will automatically analyze the image and remove the background, leaving only the subject. Review the result and make adjustments if necessary.
- Step 3: Download the Edited Image: Once satisfied with the result, download the edited image with the removed background. Remove.BG often provides options to download in various formats like PNG.
- Step 4: Further Editing (Optional): If needed, you can further edit the image with a new background or additional adjustments using other photo editing tools.
Tips for Effective Background Editing:
- Check for Fine Details: After the automatic removal, check for any fine details or edges that might need manual adjustment to ensure a clean and accurate result.
- Experiment with Backgrounds: Explore different background options to replace the removed background. Consider using solid colors, gradients, or even other images to suit your creative vision.
- Combine with Other Editing Tools: For more comprehensive edits, consider combining the edited image from Remove.BG with other photo editing tools to add effects, adjust colors, or enhance details.
By following this guide, users can leverage Remove.BG’s specialized capabilities for swift and effective background removal, enhancing various types of pictures with clean and isolated subjects.
Background Eraser (Mobile) Tool Overview:
Background Eraser is a user-friendly mobile app that focuses on efficiently removing backgrounds from images. It provides a simple and intuitive interface, making it accessible for users looking to isolate subjects from their backgrounds.
Editing Specific Types of Pictures:
- Pet Photography: Use Background Eraser to remove distracting backgrounds from pet photos, allowing the adorable pets to take center stage without any visual clutter.
- DIY Product Photography: Optimize DIY product photography by using Background Eraser to isolate products. This creates clean and professional-looking images suitable for online platforms.
- Family and Group Photos: Enhance family or group photos by removing backgrounds with Background Eraser, achieving a cohesive and focused look across the entire image.
- Personalized Greeting Cards: Create personalized greeting cards by isolating subjects with Background Eraser. This enables users to add custom backgrounds or create transparent elements.
- Artistic Creations: Experiment with artistic creations by using Background Eraser to isolate specific elements in photos, allowing for creative and visually striking compositions.
Detail Step-by-Step Guide:
- Step 1: Open Image in Background Eraser: Download and install Background Eraser from your mobile app store. Open the app and import the image you want to edit.
- Step 2: Choose Eraser Tool: Select the eraser tool within Background Eraser. Adjust the brush size based on the details of the image.
- Step 3: Erase Background: Use the eraser tool to remove the background by swiping over the areas you want to erase. Background Eraser often provides real-time preview options.
- Step 4: Refine Edges and Details: Pay attention to edges and details to ensure a clean removal. Background Eraser typically includes features for adjusting brush hardness and zooming for precision.
- Step 5: Save Your Edited Image: Save the edited image with the removed background. Background Eraser usually allows saving in common formats like PNG, preserving transparency.
Tips for Effective Background Editing:
- Use Zoom for Precision: Zoom in on the image to work on fine details. This ensures accurate removal without accidentally erasing parts of the subject.
- Experiment with Background Options: After removing the background, experiment with different background options. Background Eraser provides a blank canvas, allowing for creative replacements.
- Combine with Other Editing Apps: For additional enhancements, consider using other photo editing apps alongside Background Eraser to add filters, effects, or adjust colors.
By following this guide, users can effectively utilize Background Eraser for removing backgrounds from various types of pictures, achieving professional and visually appealing results directly from their mobile devices.
Superimpose X (Mobile) Tool Overview:
Superimpose X is a powerful mobile app that goes beyond basic background removal, offering advanced features for layering, blending, and creating intricate compositions. It is ideal for users seeking more control and precision in background editing.
Editing Specific Types of Pictures:
- Double Exposure Art: Utilize Superimpose X to create captivating double exposure art by blending two images seamlessly, allowing for creative and artistic expressions.
- Professional Portraits: Enhance professional portraits by using Superimpose X for precise background removal and replacement. Achieve clean and polished results for professional profiles.
- Creative Collages: Craft creative collages with Superimpose X by combining multiple images and adjusting backgrounds. This app provides tools for seamless blending and composition.
- Detailed Object Removal: Remove intricate details or objects from photos with precision using Superimpose X, ensuring clean and flawless edits.
- Dynamic Social Media Graphics: Elevate social media graphics by using Superimpose X to create dynamic visuals with customized backgrounds, suitable for platforms like Instagram or Twitter.
Detail Step-by-Step Guide:
- Step 1: Import Images to Superimpose X: Download and install Superimpose X from your mobile app store. Import the base image and the image you want to superimpose as layers.
- Step 2: Arrange Layers: Arrange the layers in Superimpose X, placing the subject layer on top of the background layer. Use the app’s interface to precisely position and resize layers.
- Step 3: Masking and Erasing: Utilize Superimpose X’s masking and erasing tools to remove the unwanted background from the subject layer. Adjust the brush size and opacity for detailed edits.
- Step 4: Adjust Blend Modes: Experiment with different blend modes in Superimpose X to seamlessly blend the subject layer with the background layer. Choose modes that enhance the overall composition.
- Step 5: Fine-Tune Edges and Details: Fine-tune edges and details using Superimpose X’s tools. This app provides features for refining selections and ensuring a realistic integration between subject and background.
- Step 6: Save Your Edited Image: Save the edited image within Superimpose X. The app typically offers options to save in various formats, including PNG for transparent backgrounds.
Tips for Effective Background Editing:
- Explore Advanced Blending Options: Superimpose X provides advanced blending options. Explore these options to achieve unique effects and enhance the overall visual impact.
- Utilize Masking for Precision: Leverage masking tools for precise edits. Superimpose X allows users to mask specific areas, providing control over which parts of the image are visible.
- Experiment with Filters and Adjustments: Enhance your composition further by applying filters and adjustments within Superimpose X. Experiment with color grading and effects to achieve the desired mood.
By following this guide, users can harness the advanced features of Superimpose X for intricate background editing, creating professional and visually striking compositions directly from their mobile devices.
TouchRetouch (Mobile) Tool Overview
TouchRetouch is a powerful mobile app that specializes in removing unwanted objects, people, or backgrounds from photos. It offers intuitive tools for precise edits, making it an excellent choice for users seeking a clean and seamless background removal.
Editing Specific Types of Pictures
- Street Photography: Enhance street photography by removing distracting elements or people from the background, ensuring a focused and aesthetically pleasing composition.
- Outdoor Portraits: Refine outdoor portraits by eliminating unwanted backgrounds or objects, allowing the main subject to stand out prominently in a clean and professional manner.
- Urban Scenes: Use TouchRetouch to clean up urban scenes by removing signage, wires, or other distractions, resulting in polished and visually appealing cityscape photos.
- Vacation Photos: Improve vacation photos by eliminating unwanted objects or tourists from the background, creating a more pristine and personalized travel snapshot.
- Nature Photography: Edit nature photos with TouchRetouch to remove any undesired elements, ensuring that the focus remains on the natural beauty of the landscape or wildlife.
Detail Step-by-Step Guide:
- Step 1: Open Image in TouchRetouch: Download and install TouchRetouch from your mobile app store. Open the app and import the image you want to edit.
- Step 2: Select Brush or Lasso Tool: Choose the appropriate tool for background removal. TouchRetouch typically provides options like a brush or lasso tool for precise selections.
- Step 3: Mark Unwanted Elements: Use the selected tool to mark the unwanted elements or background portions you want to remove. The app often provides a real-time preview for accurate adjustments.
- Step 4: Remove and Refine: Tap the “Go” or “Remove” button to eliminate the marked areas. Refine the result by using additional tools for fine-tuning or adjusting specific details.
- Step 5: Save Your Edited Image: Save the edited image with the removed background. TouchRetouch typically allows saving in common formats like JPEG, preserving the edited result.
Tips for Effective Background Editing:
- Experiment with Clone Stamp: TouchRetouch often includes a clone stamp tool. Experiment with this tool to replicate textures or patterns in areas where elements were removed for a natural look.
- Use Healing Brush for Smoothing: The healing brush tool in TouchRetouch is useful for smoothing out areas where unwanted elements were removed, ensuring a seamless and polished result.
- Undo and Redo: Take advantage of the undo and redo options in TouchRetouch to revert changes or compare different stages of the editing process.
By following this guide, users can efficiently use TouchRetouch for background editing in various types of pictures, achieving clean and professional-looking results directly from their mobile devices.
Prisma (Web/Mobile) Tool Overview
Prisma is a unique web and mobile app that transforms photos into artworks using a variety of artistic filters inspired by famous artists. While Prisma is primarily known for its artistic effects, it can be creatively used for background enhancements and alterations.
Editing Specific Types of Pictures:
- Portrait Artistry: Use Prisma to add artistic flair to portrait backgrounds, transforming them into visually stunning and unique compositions inspired by renowned artists.
- Nature and Landscape: Enhance the beauty of nature and landscape photos by applying Prisma’s artistic filters, turning ordinary backgrounds into captivating and vibrant works of art.
- Urban Scenes: Experiment with Prisma’s filters to give urban scenes a distinctive and abstract touch, adding a creative and artistic element to cityscape photos.
- Event Photography: Apply Prisma’s artistic effects to background elements in event photos, creating a more visually appealing and memorable atmosphere.
- Custom Artistic Compositions: Use Prisma to create custom artistic compositions by transforming backgrounds into unique visual masterpieces that go beyond traditional photo editing.
Detail Step-by-Step Guide:
- Step 1: Upload Image to Prisma: Visit the Prisma website or launch the mobile app. Upload the image you want to edit by selecting it from your device’s gallery.
- Step 2: Choose Artistic Filter: Explore Prisma’s wide array of artistic filters. Experiment with different styles to find a filter that complements and enhances the background of your photo.
- Step 3: Adjust Filter Strength: Prisma often allows users to adjust the strength or intensity of the selected filter. Fine-tune the settings to achieve the desired balance between the subject and background.
- Step 4: Save Your Artwork: Once satisfied with the artistic transformation, save your edited image. Prisma typically allows saving in common formats like JPEG or PNG.
Tips for Effective Background Editing:
- Combine Filters for Layers: Experiment with applying multiple Prisma filters to different layers of your image. This can create complex and visually intriguing background compositions.
- Explore Styles for Different Effects: Prisma offers a variety of artistic styles. Explore different styles to see how they uniquely impact the background, creating diverse visual effects.
- Use Prisma as a Complementary Tool: While Prisma may not have specific background removal tools, it excels at transforming backgrounds artistically. Consider using it in conjunction with other editing apps for a comprehensive result.
By following this guide, users can leverage Prisma’s artistic filters to creatively enhance backgrounds in various types of pictures, turning ordinary scenes into captivating works of art.
InPixio (Desktop) Tool Overview
InPixio is a versatile desktop photo editing software that provides users with a range of tools for enhancing and manipulating images. It offers features for background removal and replacement, making it a valuable tool for users looking to customize their photos.
Editing Specific Types of Pictures:
- Family Portraits: Use InPixio to edit backgrounds in family portraits, allowing users to replace or enhance the backdrop for a cohesive and visually appealing family photo.
- Special Occasion Photos: Enhance photos from special occasions, such as birthdays or celebrations, by utilizing InPixio’s background editing tools for a personalized touch.
- Professional Headshots: Optimize professional headshots by removing or replacing backgrounds with InPixio, ensuring a clean and polished look suitable for resumes or profiles.
- Product Photography: Edit backgrounds in product photos to create a uniform and professional presentation for e-commerce or marketing purposes using InPixio.
- Creative Compositions: Experiment with creative compositions by manipulating backgrounds in photos, adding artistic elements, or creating visually striking scenes with InPixio.
Detail Step-by-Step Guide:
- Step 1: Open Image in InPixio: Launch InPixio on your desktop and open the image you want to edit.
- Step 2: Access Background Editing Tools: Navigate to the background editing tools or features within InPixio. Look for options like “Background Removal” or “Replace Background.”
- Step 3: Choose Background Editing Option: Select the appropriate tool for background editing based on your preferences. InPixio typically provides options for manual removal or automatic background replacement.
- Step 4: Make Background Adjustments: Use the selected tool to make adjustments to the background. This may involve removing the existing background or replacing it with a new one from InPixio’s library.
- Step 5: Refine Edges and Details: Pay attention to edges and details within the image. InPixio often includes tools for refining edges and ensuring a seamless blend between the subject and the new background.
- Step 6: Save Your Edited Image: Save your edited image within InPixio, ensuring the preservation of layers for future adjustments. Export the final image in your preferred format.
Tips for Effective Background Editing:
- Utilize InPixio’s Background Library: Explore InPixio’s background library for a variety of pre-designed backgrounds that can complement your edited photos.
- Experiment with Filters and Effects: InPixio offers various filters and effects. Experiment with these to add creative elements to your backgrounds or enhance the overall atmosphere of your photos.
- Fine-Tune Lighting and Color: Adjust lighting and color settings to ensure that the subject and background blend seamlessly. InPixio provides tools for fine-tuning these aspects.
By following this guide, users can effectively use InPixio’s desktop editing capabilities to edit backgrounds in various types of pictures, achieving professional and visually appealing results.
Luminar AI (Desktop) Tool Overview
Luminar AI is a powerful desktop photo editing software that leverages artificial intelligence to streamline and enhance the editing process. It offers a range of creative tools, including features for background editing, making it a versatile choice for photographers and enthusiasts.
Editing Specific Types of Pictures:
- Portrait Photography: Use Luminar AI to edit backgrounds in portrait photos, applying AI-powered enhancements to create a visually stunning and professional backdrop for subjects.
- Creative Compositions: Experiment with creative compositions by leveraging Luminar AI’s advanced tools for background editing. Add artistic elements or transform backgrounds for unique visual effects.
- Landscape Photography: Enhance landscape photos by adjusting backgrounds with Luminar AI. Fine-tune colors, add atmospheric effects, or replace skies for captivating and immersive landscapes.
- Event Photography: Edit backgrounds in event photos using Luminar AI to create a cohesive and visually appealing atmosphere. Enhance the overall mood of event images with creative background adjustments.
- Artistic Edits: Explore artistic edits by manipulating backgrounds in various ways. Luminar AI’s AI-driven features allow for innovative and imaginative adjustments, giving photos a distinct and personalized touch.
Detail Step-by-Step Guide:
- Step 1: Open Image in Luminar AI: Launch Luminar AI on your desktop and open the image you want to edit.
- Step 2: Access AI Enhancements: Explore Luminar AI’s AI-powered enhancements. Look for options related to background editing, such as “AI Sky Replacement” or “AI Augmented Sky.”
- Step 3: Choose Background Editing Features: Select the specific features or tools for background editing. Luminar AI often provides sliders and controls for adjusting sky elements, colors, or adding creative effects.
- Step 4: Apply AI-Powered Adjustments: Apply AI-powered adjustments to the background. Experiment with different presets or fine-tune settings to achieve the desired look for the background.
- Step 5: Add Artistic Elements (Optional): If desired, explore Luminar AI’s artistic elements and effects to further enhance the background creatively. This could include adding textures, overlays, or adjusting lighting.
- Step 6: Save Your Edited Image: Save the edited image within Luminar AI. The software typically allows saving in common formats like JPEG or TIFF, preserving the edited result.
Tips for Effective Background Editing:
- Experiment with AI Styles: Luminar AI offers AI Styles that can dramatically change the overall look of an image. Experiment with different styles to find the one that complements your background.
- Fine-Tune Lighting and Shadows: Use Luminar AI’s tools to fine-tune lighting and shadows in the background. This ensures a balanced and realistic appearance.
- Explore AI Augmented Sky: Luminar AI’s “AI Augmented Sky” feature allows you to replace the sky in your images. Explore this tool for creative sky replacements in outdoor photos.
By following this guide, users can effectively use Luminar AI’s advanced features for background editing, achieving professional and creatively enhanced results in various types of pictures.
Movavi Photo Editor (Desktop) Tool Overview:
Movavi Photo Editor is a desktop software designed for photo editing, offering a range of features for enhancing and manipulating images. It provides intuitive controls, making it accessible for users with varying levels of editing experience.
Editing Specific Types of Pictures:
- Family Photos: Use Movavi Photo Editor to enhance family photos by adjusting and refining backgrounds. Create visually appealing family portraits with clean and well-composed backgrounds.
- Product Photography: Optimize product images for e-commerce by using Movavi Photo Editor to remove distractions from the background. Ensure that the focus remains on the showcased products.
- Travel Photography: Edit backgrounds in travel photos, adjusting colors or removing unwanted elements to highlight the beauty of different destinations. Create polished and captivating travel snapshots.
- Personalized Cards and Invitations: Customize backgrounds for personalized cards or invitations using Movavi Photo Editor. Add creative elements or replace backgrounds for a unique and personalized touch.
- Portrait Photography: Refine backgrounds in portrait photos to create a cohesive and visually pleasing composition. Movavi Photo Editor’s tools allow for precise adjustments to enhance the overall look.
Detail Step-by-Step Guide:
- Step 1: Open Image in Movavi Photo Editor: Launch Movavi Photo Editor on your desktop and open the image you want to edit.
- Step 2: Access Background Editing Tools: Navigate to the editing tools section. Look for features related to background adjustments, such as the “Magic Wand” or “Selection” tools.
- Step 3: Select and Remove Background Elements: Use the selection tools to mark the elements you want to remove from the background. Movavi Photo Editor typically provides options for automatic selection or manual adjustments.
- Step 4: Refine Edges and Details: Refine edges and details using Movavi Photo Editor’s tools to ensure a clean and accurate removal. Adjust settings for feathering or smoothing to achieve a seamless result.
- Step 5: Choose a New Background (Optional): Movavi Photo Editor often allows users to add a new background. Choose from existing backgrounds or upload your own to replace the removed elements.
- Step 6: Save Your Edited Image: Save the edited image within Movavi Photo Editor. Export the final image in your preferred format, preserving the edited result.
Tips for Effective Background Editing:
- Experiment with Filters and Effects: Movavi Photo Editor provides a variety of filters and effects. Experiment with these to add creative elements or enhance the overall atmosphere of your background.
- Use Color Correction for Consistency: If replacing backgrounds, use Movavi Photo Editor’s color correction tools to ensure consistency between the subject and the new background.
- Apply Textures or Overlays: Enhance backgrounds by applying textures or overlays available in Movavi Photo Editor. This adds depth and visual interest to the edited image.
By following this guide, users can effectively use Movavi Photo Editor for background editing in various types of pictures, achieving professional and visually appealing results directly from their
Affinity Photo (Desktop) Tool Overview:
Affinity Photo is a robust desktop photo editing software designed for professional-level editing. It offers a wide range of tools and features, making it suitable for precise background editing and various creative enhancements.
Editing Specific Types of Pictures:
- High-Resolution Portraits: Utilize Affinity Photo to edit backgrounds in high-resolution portrait photos. Take advantage of advanced tools for detailed adjustments, ensuring a polished and professional look.
- Architectural Photography: Enhance architectural photos by adjusting and refining backgrounds with Affinity Photo. Ensure clean and visually appealing compositions for architectural images.
- Artistic Compositions: Experiment with artistic compositions by leveraging Affinity Photo’s advanced features. Add creative elements or manipulate backgrounds for unique and visually striking results.
- Macro Photography: Edit backgrounds in macro photos using Affinity Photo’s precise tools. Fine-tune colors, adjust details, and create visually captivating backgrounds for macro shots.
- Product Photography: Optimize product images for e-commerce or marketing by using Affinity Photo to remove distractions from the background. Ensure a professional and clean presentation for products.
Detail Step-by-Step Guide:
- Step 1: Open Image in Affinity Photo: Launch Affinity Photo on your desktop and open the image you want to edit.
- Step 2: Access Advanced Editing Tools: Navigate to Affinity Photo’s advanced editing tools. Explore features such as the “Selection Brush,” “Refine Selection,” or “Masking” tools for precise background editing.
- Step 3: Select and Mask Background Elements: Use the selection tools to mark the elements you want to remove from the background. Affinity Photo provides advanced masking options for detailed and accurate selections.
- Step 4: Refine Edges and Details: Refine edges and details using Affinity Photo’s advanced tools to ensure a clean and accurate removal. Adjust settings for feathering, smoothing, or anti-aliasing for seamless results.
- Step 5: Replace or Enhance Background (Optional): Affinity Photo allows users to replace or enhance backgrounds. Choose from existing backgrounds or create custom enhancements to achieve the desired look.
- Step 6: Save Your Edited Image: Save the edited image within Affinity Photo. Export the final image in your preferred format, preserving the professional-grade quality of the edited result.
Tips for Effective Background Editing:
- Utilize Adjustment Layers: Affinity Photo offers adjustment layers for non-destructive editing. Utilize these layers for additional adjustments to colors, tones, or effects without altering the original image.
- Explore Advanced Filters: Experiment with advanced filters in Affinity Photo to add creative effects or enhance the overall atmosphere of the background.
- Combine Vector and Raster Editing: Take advantage of Affinity Photo’s capability to seamlessly combine vector and raster editing. This allows for precise adjustments and creative freedom in background editing.
By following this guide, users can effectively leverage Affinity Photo’s advanced features for background editing in various types of pictures, achieving professional and visually stunning results directly from their desktop
Paint.NET (Desktop) Tool Overview:
Paint.NET is a user-friendly desktop photo editing software that strikes a balance between simplicity and functionality. While not as feature-rich as some professional-grade tools, it offers a range of powerful features for users seeking effective and straightforward editing.
Editing Specific Types of Pictures:
- Social Media Graphics: Use Paint.NET to edit backgrounds for social media graphics. Adjust colors, add text, or remove unwanted elements to create eye-catching visuals for various platforms.
- Personal Projects and Collages: Enhance backgrounds in personal projects or collages using Paint.NET. The software’s intuitive interface allows users to quickly achieve desired edits for creative projects.
- Event Photos: Edit backgrounds in event photos, removing distractions or adjusting colors for a more polished appearance. Paint.NET’s simplicity makes it accessible for quick edits.
- Simple Product Edits: Optimize product images for basic edits by adjusting backgrounds or removing minor distractions. Paint.NET provides essential tools for straightforward product photo enhancements.
- Casual Photography: Use Paint.NET for casual photography edits, such as refining backgrounds in vacation photos or personal snapshots. The software’s ease of use makes it suitable for quick edits.
Detail Step-by-Step Guide:
- Step 1: Open Image in Paint.NET: Launch Paint.NET on your desktop and open the image you want to edit.
- Step 2: Access Basic Editing Tools: Navigate to Paint.NET’s basic editing tools. Explore features like the “Magic Wand” for quick selections or the “Eraser” for manual adjustments.
- Step 3: Select and Remove Background Elements: Use the “Magic Wand” tool to select portions of the background you want to remove. Adjust the tolerance level for precise or broader selections.
- Step 4: Refine Edges and Details: Refine edges and details using the “Eraser” tool or additional selection tools. Paint.NET allows users to fine-tune selections for a cleaner removal.
- Step 5: Replace or Adjust Background (Optional): If desired, users can replace or adjust the background. Paint.NET provides options to add a new background layer or apply color adjustments to the existing one.
- Step 6: Save Your Edited Image: Save the edited image within Paint.NET. Export the final image in common formats such as PNG or JPEG, preserving the edited result.
Tips for Effective Background Editing:
- Experiment with Effects: Paint.NET offers a variety of effects. Experiment with these to add creative elements or enhance the overall atmosphere of your background.
- Use Layers for Non-Destructive Editing: Utilize Paint.NET’s layer functionality for non-destructive editing. This allows you to make adjustments without altering the original image.
- Explore Plugins for Additional Features: Paint.NET supports plugins that can extend its functionality. Explore available plugins to add more features and capabilities to the software.
By following this guide, users can effectively use Paint.NET for background editing in various types of pictures, achieving quick and visually pleasing results directly from their desktop.
PicMonkey (Web/Mobile) Tool Overview
PicMonkey is a versatile web and mobile-based photo editing platform that offers a range of creative tools and features. It provides users with an intuitive interface and the ability to edit photos on the go through its mobile app.
Editing Specific Types of Pictures:
- Social Media Posts: Use PicMonkey to edit backgrounds for social media posts. Add overlays, adjust colors, or remove distractions to create engaging visuals for various social platforms.
- Blog and Website Graphics: Enhance backgrounds for blog post graphics or website visuals using PicMonkey. The platform’s design features make it easy to create visually appealing and cohesive web graphics.
- Event Announcements: Edit backgrounds in event announcement images, adding text or themed elements to create attractive and informative visuals. PicMonkey’s mobile app allows for quick edits on the go.
- Creative Collages: Create creative collages by editing backgrounds with PicMonkey. Experiment with overlays, textures, and blending modes to achieve unique and visually interesting compositions.
- Personalized Invitations: Customize backgrounds for personalized invitations using PicMonkey. Add text, graphics, or adjust colors to create inviting and personalized invitation visuals.
Detail Step-by-Step Guide:
- Step 1: Open Image in PicMonkey: Access PicMonkey through the web platform or mobile app. Open the image you want to edit.
- Step 2: Explore Creative Tools: Navigate PicMonkey’s creative tools. Explore features such as overlays, textures, or themes to enhance the background creatively.
- Step 3: Select and Adjust Background Elements: Use PicMonkey’s selection tools to target specific background elements for adjustment. Adjust colors, brightness, or apply creative effects to achieve the desired look.
- Step 4: Experiment with Overlays: Experiment with overlays provided by PicMonkey. Add textures, patterns, or graphics to the background for a unique and personalized touch.
- Step 5: Add Text and Elements (Optional): If desired, add text or additional design elements to the background. PicMonkey’s text and graphic tools make it easy to customize images for various purposes.
- Step 6: Save Your Edited Image: Save the edited image within PicMonkey. Export the final image in common formats such as JPEG or PNG, preserving the creative edits.
Tips for Effective Background Editing:
- Use PicMonkey Mobile App for On-the-Go Edits: Take advantage of PicMonkey’s mobile app for quick and convenient edits, especially when creating visuals on the go.
- Combine Textures and Overlays: Experiment with combining textures and overlays to add depth and visual interest to the background. PicMonkey offers a variety of creative options for layering.
- Explore PicMonkey’s Design Templates: PicMonkey provides design templates for various purposes. Explore these templates to kickstart your background editing and customize them for your specific needs.
By following this guide, users can effectively use PicMonkey for background editing in various types of pictures, achieving creative and visually appealing results on both web and mobile platforms.
RawTherapee (Desktop) Tool Overview
RawTherapee is an advanced open-source photo editing software designed for RAW image processing. It provides photographers with extensive control over image adjustments, making it an excellent choice for precise background editing.
Editing Specific Types of Pictures:
- Professional Photography Projects: Utilize RawTherapee for background editing in professional photography projects. Adjust backgrounds to meet the specific requirements of clients or project themes.
- High-Quality Landscape Photography: Enhance backgrounds in high-quality landscape photos using RawTherapee. Fine-tune colors, contrast, and details to create visually stunning and immersive landscapes.
- Portrait Retouching and Background Adjustment: Edit backgrounds in portrait photos by utilizing RawTherapee’s advanced tools. Achieve seamless and professional-looking portrait backgrounds with precise adjustments.
- Architectural and Interior Photography: Optimize backgrounds in architectural or interior photography. Correct perspectives, adjust lighting, and enhance details to create polished and visually appealing architectural images.
- Macro Photography Edits: Edit backgrounds in macro photos using RawTherapee’s detailed controls. Adjust colors, tones, and sharpness to achieve captivating and well-balanced backgrounds for macro shots.
Detail Step-by-Step Guide:
- Step 1: Import RAW Image into RawTherapee: Launch RawTherapee on your desktop and import the RAW image you want to edit. RawTherapee excels in processing RAW files, preserving maximum image quality.
- Step 2: Navigate to Editing Controls: Explore RawTherapee’s extensive editing controls. Navigate to the relevant tabs, including exposure, color, and detail controls for background adjustments.
- Step 3: Adjust Background Elements: Use RawTherapee’s controls to adjust background elements such as colors, tones, and saturation. Fine-tune these settings to achieve the desired look for the background.
- Step 4: Apply Graduated Filters or Masks: RawTherapee allows the application of graduated filters or masks. Use these tools to selectively adjust portions of the background for more controlled and targeted edits.
- Step 5: Correct Perspective and Distortion: If needed, use RawTherapee’s perspective correction tools to correct any distortions or perspectives in architectural or interior photography backgrounds.
- Step 6: Fine-Tune Details and Sharpness: Fine-tune background details and sharpness to ensure a polished and professional appearance. RawTherapee provides controls for precise adjustments in these areas.
- Step 7: Save Edited Image: Save the edited image in your preferred format. RawTherapee allows exporting in various formats while preserving the high-quality edits made to the background.
Tips for Effective Background Editing:
- Experiment with Local Adjustments: Utilize RawTherapee’s local adjustment tools for targeted edits on specific areas of the background. This is particularly useful for adjusting backgrounds in portrait photography.
- Use Color Grading for Atmosphere: Experiment with color grading tools in RawTherapee to add atmosphere and mood to the background. Adjust color tones to match the desired visual style.
- Explore Film Simulation and Styles: RawTherapee offers film simulation and styles. Explore these presets to achieve specific looks for your background, adding a creative touch to your edits.
By following this guide, users can effectively use RawTherapee for background editing in various types of pictures, achieving professional and high-quality results in their photography projects.


