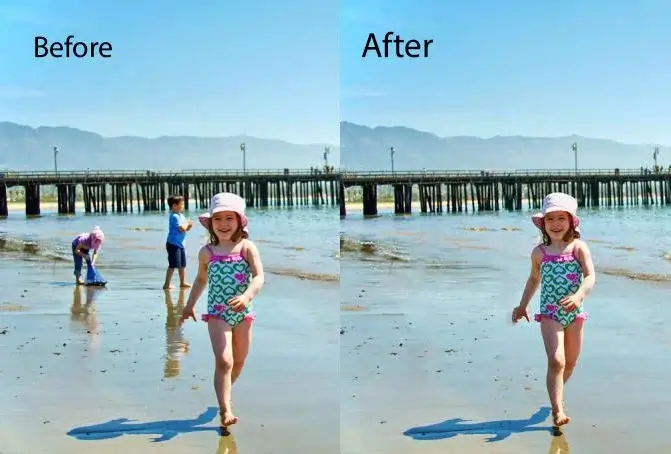
Whether it’s an unwanted object in a scenic landscape or an individual disrupting the composition of a photograph, the ability to remove objects or people effortlessly can significantly enhance the overall visual appeal of an image. With its advanced tools, Adobe Photoshop allows users to achieve this with just a few clicks. This comprehensive guide will walk you through the step-by-step process of using Adobe Photoshop to effectively remove object in Photoshop and individuals, ensuring an overall heightened visual appeal for your images.
Here’s how to remove anything from your images, like people and other distracting items, with the Content-Aware Fill tool in Photoshop.
Video Tutorial:
Removing Objects or Persons with Ease: A Step-by-Step Guide in Photoshop
Step 1: Open Your Image in Photoshop
Launch Adobe Photoshop and open the image from which you want to remove an object or person.
Step 2: Duplicate the Background Layer
To maintain the original image for reference, duplicate the background layer. Right-click on the background layer and choose “Duplicate Layer.”
Step 3: Select the Object or Person
Select the “Object Selection Tool” from the toolbar. Draw a loose selection around the object or person you want to remove. Photoshop will automatically refine the selection based on the subject.
To remove an object, first select it. You don’t need to make a perfect object selection, but it should be big enough to blend into the environment.
Step 4: Use the Content-Aware Fill option:

Once the selection is made, go to the “Edit “menu > “Content-Aware Fill.” It will open a new window. This powerful feature uses AI to intelligently fill the selected area, blending it seamlessly with the surrounding pixels.
Step 5: Adjust the Content-Aware Fill Settings
A Content-Aware Fill workspace will open with a preview of the changes. Adjust the settings on the right panel to refine the fill. You can experiment with “Color Adaptation,” “Rotation Adaptation,” and other sliders to achieve the desired result. Preview the changes in real-time before applying them.
Step 6: Apply Content-Aware Fill
Click “OK” to apply the Content-Aware Fill. Photoshop will process the information and fill the selected area based on the surrounding content.
Step 7: Fine-Tune with the Clone Stamp Tool
After using Content-Aware Fill, there might be areas that need further refinement. Select the “Clone Stamp Tool” from the toolbar. Alt-click on a clean area near the filled region and carefully paint over any imperfections or artifacts. This helps blend the edited area seamlessly with the rest of the image.
Step 8: Check for Consistency
Zoom in and thoroughly inspect the edited area for consistency. Ensure there are no visible seams or irregularities. Make additional adjustments as needed.
Step 9: Save Your Edited Image
Once satisfied with the removal, save your edited image. You can save it under a new file name to keep the original intact.
Tips for Success:
- Work with a high-resolution image to retain clarity and detail.
- Experiment with different selection tools based on the complexity of the object or person you want to remove.
- Use a soft brush for refining with the Clone Stamp Tool to achieve smoother transitions.
Following these steps, you can easily remove unwanted objects or persons from your images in just a few clicks, giving your photos a polished and professional look. Experiment with different images and scenarios to refine your skills and achieve seamless results.
Photoshop’s capabilities extend beyond basic edits, offering a realm of possibilities for photos editing services. Object and person removal becomes a breeze with the right tools and techniques, showcasing the software’s prowess. Aspiring photo editors can leverage these skills to offer comprehensive editing services, including intriguing tasks like changing eye color. With expert guidance and practice, you can unlock the full potential of Photoshop for your creative endeavors in photo editing.


