Photoshop empowers users to manipulate and enhance digital images extensively. Selecting specific elements, like hair, is a common task but often challenging due to its fine strands and varied textures. Selection tools in Photoshop are powerful yet not always easy to master. Hair presents a significant challenge for selection, with common tools often yielding unsatisfactory results. To overcome this challenge, utilize techniques and tools tailored for hair selection. Experiment with layer masks and the Refine Edge button to refine selections, especially when dealing with wispy or curly hair. In Photoshop CC, leverage the Object Selection tool for a more precise selection process. Avoid rough selection outlines by using advanced hair selection methods, ensuring a clean and natural appearance. Whether the background is black, white, or of varying lightness, mastering hair selection in Photoshop is essential for creating seamless and professional-looking compositions.
But do not worry! Photoshop has an advanced interface to enhance the edges of the selection and help you cut out things as complicated as hair. This interface is currently called Select and Apply Mask, and in previous versions, we will find it as Refine Edge.
Do you want to discover how it works? I’ll Guide you in Detail Below with step-by-step Pictures and Video. Or want to hire a photo editor to do it for you?
What is a Selection?
We have already spoken on more than one occasion about selections. The selections allow us to delimit a single part of our photograph to act only on it or to cut out that specific area and paste it elsewhere. Thanks to Photoshop selections and masks we can create impressive and realistic montages.
If you are not familiar with its basics, I recommend that you first read these articles, which will teach you step-by-step what selections and masks are, and how to use them correctly.
The Fundamentals:
When editing photos in Photoshop, one crucial skill is the ability to select and isolate specific elements within the image. This skill becomes especially important when working with hair, as it is often intricate and can be challenging to select accurately.
-
Understanding Hair Selection Challenges:
There are unique challenges that photographers and designers face. Hair is intricate and has fine details, making it difficult to separate from the background accurately. Understanding these challenges is crucial for achieving professional-looking results.
One of the primary difficulties in hair selection in Photoshop is its complex shape. Unlike other objects, hair strands can interweave and overlap, making it challenging to define clear borders around each strand. Also, hair often has varying textures and tones, further complicating the selection process.
-
Essential Tools:
Having the right tools at your disposal is crucial. Hair can be incredibly intricate and detailed, making it a challenging task to select and manipulate accurately. However, you can achieve precise hair selections in no time with the following essential tools.
1. Quick Selection Tool: This tool is perfect for quickly making rough selections of the hair. It automatically detects and selects areas based on the color and texture of the pixels you click. To use this tool, select it from the toolbar, then click and drag over the areas of hair you want to select.
2. Refine Edge Brush Tool: This tool allows you to refine your hair selection in Photoshop for more precise results. After using the Quick Selection Tool, select the Refine Edge Brush Tool from the toolbar.
Selecting Hair: Step-by-Step:
Selecting hair in Photoshop can be challenging due to its delicate and complex details. However, you can achieve professional-looking results with the proper techniques and tools. This step-by-step guide will walk you through selecting hair in Photoshop.
Step 1: Open your image
Begin by opening the image you want to work on in Photoshop. Make sure it has good resolution and clarity for better hair selection in Photoshop.
Step 2: Duplicate the Background Layer
Right-click on the Background layer in the Layers panel and select “Duplicate Layer.” This will create a copy of the original image, allowing you to work non-destructively.
Step 3: Use the Quick Selection Tool
Select the Quick Selection Tool from the toolbar or press “W” on your keyboard. Adjust the brush size to fit the size of the hair strands you select.
Step 4: Make a rough selection
Click and drag over the areas of hair you want to select. The Quick Selection Tool will automatically detect and select regions based on color and texture. Don’t worry about making a perfect selection at this stage; focus on getting the general shape of the hair.
Step 5: Refine your selection
Once you have made a rough selection with the Quick Selection Tool, it’s time to refine it for more precise results. Select the Refine Edge Brush Tool from the toolbar or press “R” on your keyboard.
Step 6: Adjust the brush settings
Adjust the brush settings to fit your needs in the options bar at the top of the screen. Increase or decrease the brush size and hardness for more accurate selection.
Step 7: Paint over the edges of the hair
Using the Refine Edge Brush Tool, carefully paint over the edges of the hair to refine your selection. Pay attention to areas where the hair meets the background or other objects, as these areas can be tricky to select accurately.
Step 8: Use additional tools if needed If you find that “the Quick Selection Tool and Refine Edge Brush Tool” are insufficient for your hair selection in Photoshop, you can also try using additional tools, such as the Lasso Tool or the Pen Tool.
The Lasso Tool allows you to manually draw a selection around the hair strands. Simply select the Lasso Tool from the toolbar and carefully remove around the hair, following its shape closely.
Select & Change Hair Color in PhotoShop(Video Tutorial)
Best Way to Select Hair Perfectly in Photoshop:
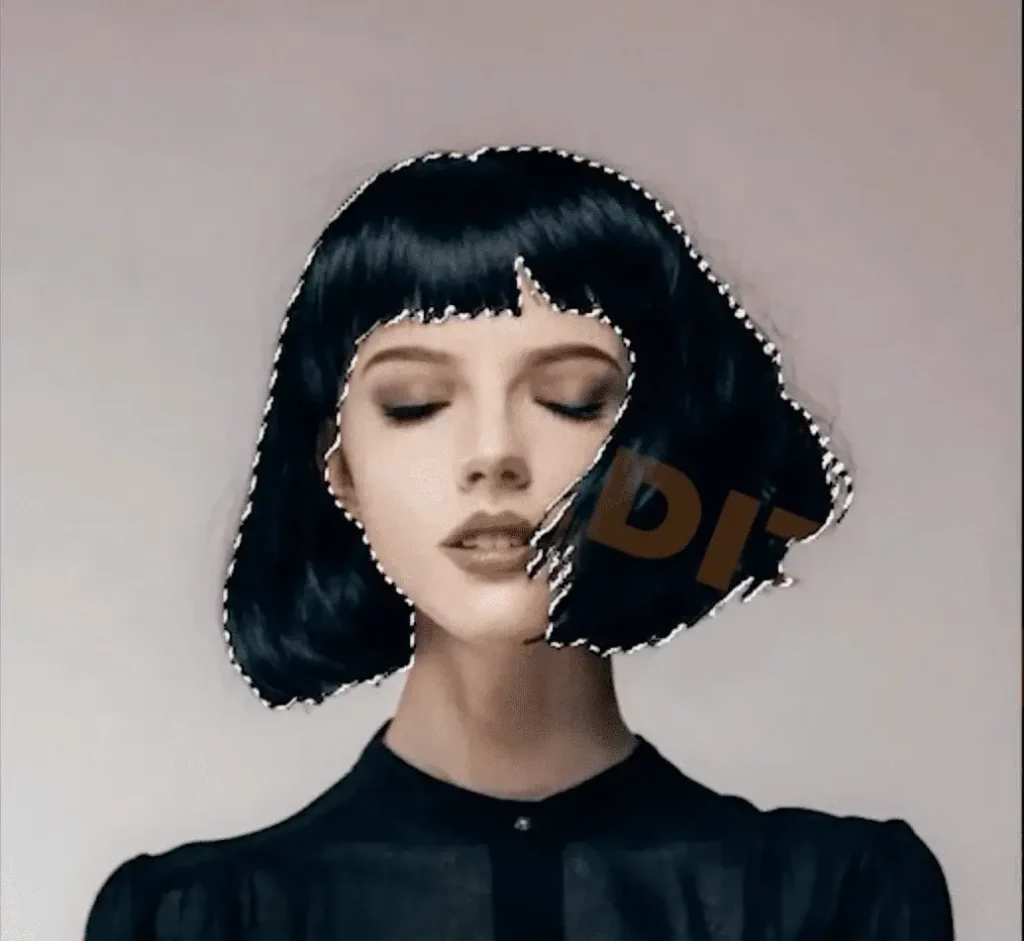
In this case, I have painted the entire edge of the hair and the lace parts that protrude below. Photoshop will recalculate that selection to fit it as well as possible. This option may not work well if the hair and background are very similar in color. However, if they are differentiated, it will not usually give you any problems.
It is recommended that you use a small brush to recalculate just the border of the selection, as this tool tends to leave the border semi-transparent to improve its integration. If you use a brush that is too thick, it may leave a large area semi-transparent, such as part of the head, and it will not look good.
This is how our selection has turned out after recalculating it with the Brush tool to refine the edges.
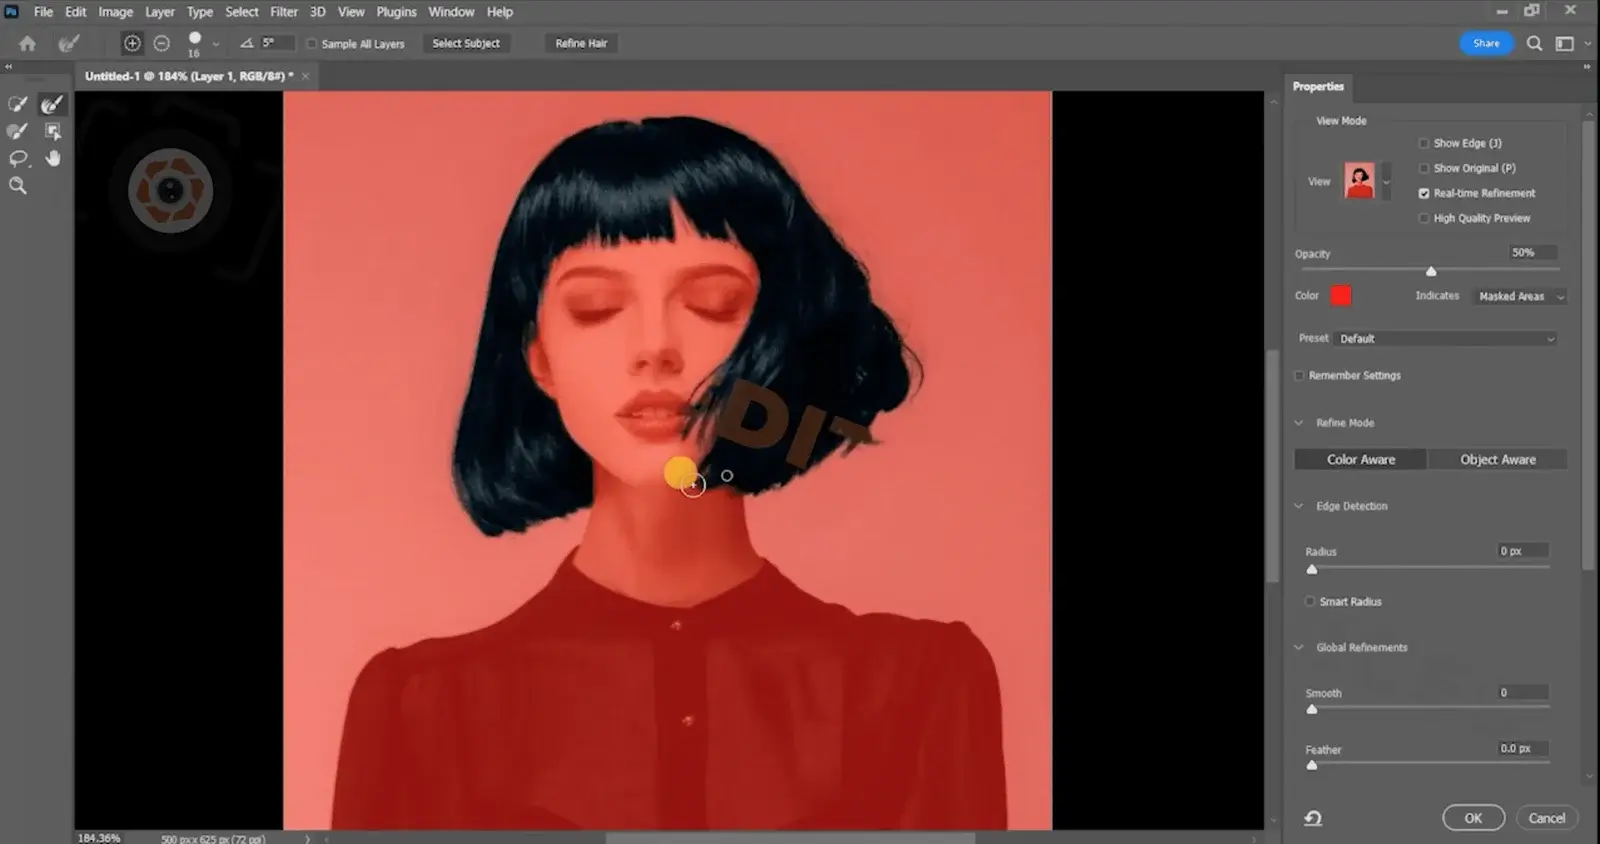
If you notice that an area has not been selected correctly, or that, as I mentioned, some parts have become semi-transparent, in the toolbar on the left you will find different selection tools that will help you speed up the selection as much as possible. You will find the quick selection, the lasso, and a brush/eraser to paint the selection by hand. In the menu on the right, you will also find several sliders to modify the selection and adjust it to your liking. You can add feathering, feathering, expanding or contracting its border, etc.
Finally, a very interesting option that you should check before accepting your selection is Decontaminate colors, which you can find at the bottom right, in the output settings. This option will automatically paint the borders of your selection with the surrounding color, to alleviate auras and background color contaminations on your selection.
On the left, the hair is cut without decontaminating the colors. On the right, with the option Decontaminate colors checked.
When you have your selection ready, export it simply by pressing OK. You can export it in multiple ways, which you can configure in the Output Settings menu (bottom right): as a selection, as a mask on the current layer, as a new layer with a mask, and even as a new file. I like to export it as a new layer with a mask, to be able to modify it to my liking in the next step.
3. Improve the Mask in Photoshop:
With the previous step, your hair may have been perfectly selected. If this is the case, congratulations! However, we have chosen a complicated photo, to show what to do when our hair is not perfectly selected. Curly hair or hair in the wind, as is the case, are much more difficult to select and that is why they need a little extra help, this time manually. As usual, the automatic processes work well when the photo is easy, but you have to give them a hand when things get complicated.
In this case, there are some areas where the mask has been slightly blurred by the blurring that those areas of the hair have suffered due to movement. To correct it and make it more natural, you can use the Brush tool in black on the mask itself, to erase them. To make it look natural, you must use a very fine brush and directly paint small black hairs on the mask to erase the areas that have not been well selected, simulating the shape of the hair itself.
You can paint over the photo itself or you can enlarge the mask to see where it’s working the worst. To see the mask enlarged, Alt+Click on it in the Layers window. Then, when you’re done retouching, tap your photo’s layer again to see it normally again.
If we press Alt+Click on the mask we can open it large to improve it more precisely.
4. Rushing to the Max: Create New Hair
In the previous step, we erased certain parts of our mask simulating the shape of the hair with a very fine brush. If you want to rush as much as possible, you can now do the opposite: create new hairs. Many times in the selection some hairs are lost that give realism to the photograph. If your hair has been too uniform or if an area has not been particularly good, you can hide it by painting hairs on top.
Simply create a new empty layer and with a very fine brush take samples from different areas of the hair and draw little hairs following the shape of the other real hairs. Its edges may be too hard and stand out more than the real hair. If this happens, when you finish drawing all the hairs add a slight Gaussian Blur to that layer to give the new hairs the same hardness as the real hairs.
By painting some extra hairs we will be able to give it the touch of realism that it lacked.
Now to Practice!
Each photograph is a world, but with this example, I am sure that you will know how to solve any problem that may arise in the most complicated selections. And like everything else, the key is to practice a lot to learn and get comfortable with the impressive tools that Photoshop offers us.
Do you want to share with us a selection of hair that you have made? Leave us a comment!


