Unlock the full potential of your landscape photography by mastering the art of “Sky Replacement in Photoshop.” The sky often serves as the canvas that brings life and drama to your scenic captures. However, unpredictable weather conditions or unimpressive skies can sometimes hinder the visual impact of your photographs. Fear not, as this comprehensive guide will take you through the intricacies of seamlessly altering and enhancing skies in your images using Adobe Photoshop.
Undoubtedly, the allure of a landscape photograph often lies in the sky. However, the challenge arises when we aren’t fortunate enough to capture a spectacular sky during our initial shot. In such instances, having the luxury of revisiting a location close to home allows for another attempt on a day with more favorable conditions. Unfortunately, when exploring distant and breathtaking destinations, the images may not showcase their full potential due to an unattractive sky. In these scenarios, the concept of sky replacement becomes a valuable tool, allowing photographers to enhance their visuals by seamlessly integrating a more appealing sky image. This technique ensures that the photos align with the awe-inspiring beauty of the landscape, even when the original sky falls short.
However, with Photoshop we can make our skies stand out much more. Do you want me to tell you what my technique is?
If you have made a photographic trip, surely more than once you will have felt disappointed in one of the most well-known and photographed locations of the place, because of the weather.
And it is that if you live near the place you can always return one day with better weather, but if you have traveled hundreds or thousands of kilometers on purpose to be able to get some dream photos, it makes you very angry to find an ugly day that takes away its charm to those photos.
I experienced a situation like this a few months ago when I traveled to Iceland. I had some good days, but many others were very gray, overcast, or foggy. The skies in many of my photos were flat and without any grace.
In my endeavor to enhance their strength, I delved into Adobe Photoshop, determined to optimize the original photo without substituting the sky. Instead of opting for a different sky, I focused on maximizing the potential of the existing one. Experimenting with various adjustments, I transformed the initially flat sky into a more visually appealing one. This process allowed me to achieve the desired results while maintaining the authenticity of the original photo.
Sky Change in Photoshop (Video Tutorial)
Thanks to these adjustments you will make any dull sky become a spectacular sky. Let’s see 3 different examples:
> An example of a Gray and Overcast sky.
> An example of a misty sky, partly cloudy but with some blue.
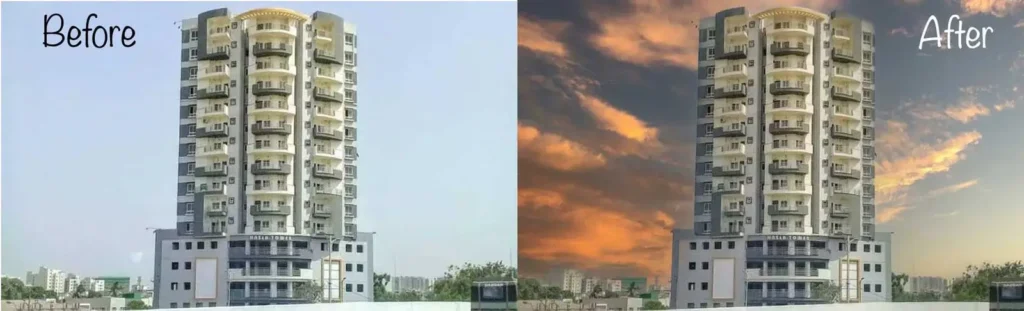
> And one last example of a dull sunset, without force.
Example 1: Gray and Overcast Sky
In our first example, we’ll explore a commonplace sky image characterized by excessive cloudiness, appearing dull, flat, and almost whitewashed. Through a series of modifications in Adobe Photoshop, we aim to transform this original image into a sky with heightened intensity, imbuing it with a more dynamic and dramatic presence. This process involves a skillful sky replacement technique to breathe new life into the composition.
1. Reveal the RAW:
The first thing you will have to do is develop the RAW file to your liking, in any development program.
I am going to do it in Adobe Camera Raw to open the photo directly in Photoshop since later I am going to use that program to enhance the sky.
The first thing we will do is give it a flat or neutral profile to gain more information both in the shadows and in the highlights of the photograph. This way we will have as much information as possible about the clouds in the sky, to enhance them later.
Next, we’ll give it a subtle touch-up, lightening the shadows and correcting the color temperature to make it a bit warmer. Above all try not to lose information in the sky in this step.
Even if the photo is not to your liking in this step, do not worry, we will correct that later, now just focus on leaving the sky flat enough so that information is not lost in the highlights.
2. Select Sky:
Now that we have our RAW file developed, the next step is to open our photo in Adobe Photoshop.
The first thing we must do is duplicate the layer by clicking on it with the right mouse button and selecting the Duplicate layer option or by using the keyboard shortcut Control+J (or Command+J on Mac).
Next, we are going to select the sky for our photograph perfectly. We can find many tools to do it as seen in the article ” Discover What Are Selections in Photoshop and How to Use the Basics “. In this case, I am going to use the Quick Selection tool which will allow me to easily select the sky.
Once you have perfectly selected the sky of your photograph, you must create a layer mask by pressing the quick button that you will find below the layers window. So all the adjustments that we apply will only affect the sky because otherwise, we would spoil the ground.
3. Give Contrast:
The most important thing to “get chicha” out of that bland sky is to give it a lot of contrast. Don’t worry if the color is ugly or if a lot of noise starts to appear since we will correct that later. Now just focus on making those slight reliefs of the sky stand out as much as possible.
To contrast the sky as much as possible, the easiest thing will be to go to the Filter/Filter menu of Camera Raw, since here we have collected all the necessary tools to give contrast to the photo. We are going to increase the sliders for Contrast, Clarity, and Dehaze, which are the 3 key settings to make the clouds much more marked.
Lower the Shadows and Blacks sliders to darken the darkest tones further, and increase the Exposure, Highlights, and Whites sliders so the sky isn’t so dull. You can also play with the Tone Curve to further contrast the image.
4. Color Correct:
Surely with the adjustments of the previous step, the sky will have acquired quite exaggerated and unreal tones. As you can see, in my photograph the sky has been contaminated with magenta in the center and cyan on the edges. In this step what we will do is desaturate the sky and give it a uniform and much more beautiful tone.
First of all, we will go to the Image/Adjustments/Desaturate menu so that our sky loses those strange colors that it has gained with so much contrast.
Then we will go to the Image / Adjustments / Color Balance menu to give the sky a little tone so that it is not so pure gray. I have given it a slight cyan tone.
5. Reduce Noise:
By contrasting our sky so much we will also have added an incredible amount of noise to it. The good thing is that precisely the clouds do not have a marked texture, so we can reduce the noise a lot without making them ugly and unreal. On the contrary, we are going to give them a very attractive smoothness.
I like Camera Raw’s noise reduction better than Photoshop’s original, so we’ll go to the Camera Raw Filter/Filter menu again, and go to the Detail tab.
Here, in the Noise Reduction section, turn the Luminance slider up and bring back a bit of detail by increasing the Detail slider. Don’t increase it too much or you’ll re-include all the noise you’re trying to remove; turn it up just enough so the clouds don’t get too flat.
6. Evens the Ground:
We have already finished the retouching of the sky! But of course, now it clashes a lot with the rest of the photograph. So, what you have to do now is correct the color of the floor. You can do this with any of the color adjustments you’ll find in the Image/Adjustments menu, but it will be much easier to use the Camera Raw Filter since you have all those adjustments collected together here.
So, select the Background layer and go to the Camera RAW Filter/Filter menu. Here you can give your floor the adjustments you want. I’ve contrasted it a bit so it doesn’t clash so much with the sky, and I’ve increased the white slider to give it a little more light. Also with the Clarity slider, I have given more strength to the textures. I have also increased the Intensity a bit to enhance those greens so characteristic of Iceland.
7. Make Final Adjustments:
Finally, we are going to give a general color adjustment to the entire photograph to finish integrating the sky and the ground. You can do it in multiple ways: by adding some color correction adjustments such as Color Balance or Hue/Saturation or for example also from the Camera Raw Filter color adjustments.
I’ve done this by adding several Color Lookup adjustment layers, to give it a color filter that emulates the famous orange teal effect.
Discover the Adobe Photoshop Color Lookup Adjustment
Specifically, I have used 4 Color Query filters:
- Filmstock_50 at 40% opacity
- Foggy Night at 20% Opacity
- Teal Orange Plus Contrast at 20% Opacity
- Fall Colors at 30% Opacity
And ready! We already have our photo retouched. We have managed to give much more strength to that gray and bland sky, right?
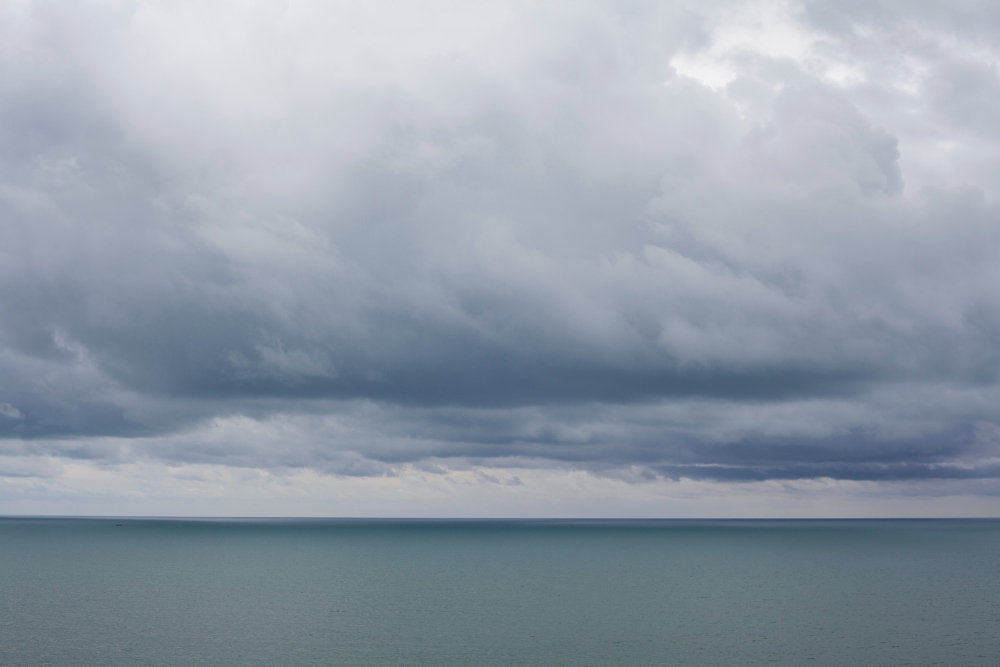
Example 2: Foggy Sky

The following example is sure that you have also seen it more than once. A partly cloudy sky but with a very desaturated blue due to the mist in the environment. By enhancing the blues we will be able to give that sky a much greater strength.
We are going to use this photograph. As you can see, since there is so much fog, the shapes of the clouds are blurred and the blue of the sky is very little perceived.
1. First Steps:
As in the previous example, the first steps are going to be the same: develop the RAW with a flat profile, so that we gain details in both the shadows and the highlights, and then duplicate the layer and select the sky to be able to adjust it without affecting the rest of the photograph.
This example also helps us to see a problem that can occur when selecting the sky. Since there is so much fog, we do not have a clear line that separates the ground from the sky, so it is impossible to select it well. At the moment we are not going to worry about this, we will make a straight line with the selection in this area and later when we have retouched the sky we will merge it better.
In the same way as before, create a layer mask by pressing the quick button below the layers window, to have the sky separated on a separate layer and affect only him.
2. Enhance the Blue of the Sky:
Having successfully executed the sky replacement by isolating it into a distinct sky layer, our next objective is to intensify the blue hues of the sky. This enhancement serves a dual purpose: it not only captures more attention but also accentuates the cloud formations, thereby eliminating the misty ambiance from the overall scene. This transformation will be applied to the new sky image while maintaining the integrity of the original image.
To do this we will go to the Filter/Filter menu of Camera Raw and we will go to the HSL Settings tab. Here you will find 3 tabs: Hue, Saturation, and Luminance, and sliders with the basic colors. In this case, we will raise the saturation and lower the luminance of the blues and cyans, to give more strength to the sky.
Then you can add a little contrast to the sky with the tools that we have seen in the previous example (contrast, clarity, and erase haze) but without going overboard, because now if strange colors appear we will not be able to desaturate the sky to fix them.
3. Evens the Ground:
Now it is the turn of the ground. Although this time the change in the sky has not been so brutal that it clashes as much as in the previous example, it will be interesting if you adjust the ground a bit to give it the tone and contrast you want. I have retouched it again with the Camera Raw Filter.
In addition, we are also going to correct the fusion between the sky and the ground that we have commented on at the beginning of the example, to integrate them correctly, since if we zoom in you will see that a straight line is a noticeable right where it cuts the sky layer mask.
You simply have to paint with a thick and diffuse brush in white along this line, so that the cut is not so hard and both parts merge better.
4. Make Final Adjustments:
To finish we can give a general color correction to the entire image to finish integrating sky and ground. I, as before, have used several adjustment layers with the Color Lookup filters :
- Filmstock_50 at 40% opacity
- Foggy Night at 20% Opacity
- Teal Orange Plus Contrast at 20% Opacity
- Fall Colors at 30% Opacity
Much better now, right??
Example 3: Dusk Off
While not all sunsets boast the vibrant reds and oranges we hope for, many times, they tend to be rather dull. Even when clouds light up, the hues may only hint at orange or yellow. Take, for instance, this photo as our example—the clouds are subtly touched with orange tones, but it’s barely noticeable. Fortunately, with a few straightforward adjustments in Photoshop, we can breathe more life into such sunsets.
Let’s consider the process step by step, starting with the original image. By incorporating sky replacement techniques, we can enhance the overall spectacle, transforming lackluster clouds into a more visually appealing canvas.
1. First Steps:
As we have done in the two previous examples, the first thing we must do is reveal the RAW so that we gain details in both the shadows and the highlights. I have also given it a somewhat warmer white balance, to start enhancing the sunset.
We will then duplicate the sky layer and select the sky to apply a layer mask to it. This way we can adjust it without affecting the rest of the original photo.
2. Boost Warm Tones:
Now we are going to enhance the orange and yellow tones, in the same way that in the previous example, we enhanced the blue ones.
We’re going to go to the Filter/ Camera Raw Filter menu and go to the HSL Settings tab. Here we are going to touch the warm tone sliders in the 3 tabs:
- In Hue, we are going to make the yellow tones more orange.
- In Saturation, we are going to increase the saturation of the reds, oranges, and yellows considerably.
- In Luminance we are going to darken the yellow tones and lighten the orange tones, to make the illuminated clouds stand out more.
3. Empower the Sunset:
Maintain continuity within the Adobe Camera Raw filter as we proceed to elevate the sunset’s aesthetic. Adjust the Color Temperature slightly warmer, infusing the sky color with a touch of warmth. Simultaneously, shift the Hue towards magenta to enhance the sunset’s vibrancy, making the yellows in the foreground image more reminiscent of a warm orange glow. This subtle adjustment contributes to an appealing lighting mode that harmonizes the overall composition.
Then we have given a little Intensity in general to all the tones.
4. Add a Little Contrast:
We are now going to contrast the sky a bit to give more presence to the clouds. We’ll stick with the Adobe Camera Raw filter and increase the Contrast, Clarity, and Dehaze sliders a bit.
By contrasting the sky so much, the colors will be quite saturated, so if you think they are too strong, you can always lower the Intensity a bit to compensate.
I’ve also lowered the Highlights slider a bit to bring back the background highlights, and the Blacks slider to bring out the clouds even more.
5. Reduce Noise:
By contrasting the sky so much we have generated a lot of noise, so now it’s time to reduce it. We will continue with the Adobe Camera Raw Filter.
Go to the Detail tab and in the Noise Reduction section increase the Luminance slider to the maximum. Then increase the Detail a little to recover some texture in the clouds, but without going too far so that the noise does not appear again.
6. Evens the Ground:
We already have the sky ready, now it’s time to touch up the ground so that it doesn’t clash so much. We have given a lot of warmth to the sky and that has to go in line with the tones of the ground.
From the Camera Raw Filter, I’ve lightened the ground a bit, contrasted it slightly, and given it some warmer tones.
To better integrate both areas we are going to mix them a little. To do this, double-click on the sky layer mask to bring up the Mask Properties.
Density: Lower the density a bit so that the retouch we have made to the sky slightly affects the ground. This will take on a bit of the tones and contrast of the sky and they will look more alike.
Feather: Feather the mask so the cut isn’t too harsh and the sky and ground blend smoothly. This way the passage from one part to the other will not be so abrupt and it will be better.
7. Make Final Adjustments:
You can finally give the entire photo color consistency by adding some general color correction adjustments. As in the previous examples, I’ve used the Color Lookup filters to add a touch of color to the entire photo and finish unifying the sky and ground. This time I used the following:
And ready! We have managed to turn a dull sunset into a dreamy sunset. The difference is remarkable, isn’t it?
Now it's your turn!
Making the sky look better in photos is simple! With a few easy changes, a photo that didn’t catch much attention can become eye-catching. You can even hire a professional photo editing service to make these adjustments for you. It’s that easy!


