
Unlock the full potential of your smartphone camera with these 8 easy tricks to edit photos effortlessly. Whether you’re a beginner photographer or a seasoned pro, harnessing the power of mobile photo editing apps like Google Photos or Adobe Lightroom on your Android device can enhance your images in seconds. From adjusting the intensity of colors to perfecting portrait mode, learn to transform your original photos into stunning edited masterpieces using just your phone and natural light.
The ability to take photographs has been prevalent in cell phones since their advent. This is nothing new, but mobile phones are also capable of photo editing with the advancing technology nowadays! Whether it is color issues, unwanted objects, cropping, or quality improvement, numerous problems can now be solved in no time using only your cell phone.
Snapseed and Instagram are two of the most highly regarded mobile photo editing apps. Following are some of the features that can be effortlessly rectified through these apps on a cell phone.
1. Straightening the horizon:

Align the horizon in your photos effortlessly using mobile editing tools or dedicated apps like Google Photos. A tilted photograph looks nice, but a slanted horizon tends to give an off-putting visual. No matter how remarkable the image is, this tiny little detail will ruin its whole impression.
Accordingly, “Rotate” (placed within the “Snap” tool on Instagram) is one capable tool for it. Select the rotating tool and rotate and adjust the image to the correct degree.
2. Cropping:

Enhance your photos effortlessly by cropping them using a mobile photo editing app or third-party apps. Adjust the composition and focus on key elements for stunning results. A picture spanning over the whole of the background can easily divert one’s attention from the main subject. Cropping the irrelevant portion will, therefore, effectively rid of that meddling distraction.
Select the part of the picture you wish to keep and apply the cropping effect – the unselected area will be smoothly removed.
(Available in the “Adjust” option on Instagram)
3. Removal of Unwanted Objects:

Eliminate distractions with a mobile photo editor or third-party apps for seamless results. Destroying the serenity of a photograph, unwanted objects are a sore sight to behold. Destroying the serenity of a photograph, unwanted objects are a sore sight to behold.
In Snapseed, the erasing of such interfering presence is handled by the “Healing” tool which, similar to Adobe Photoshop, automatically paints over the undesired object by sampling from a similar surrounding area. This aids especially well in removing minute details.
4. Contrast and brightness:
Amplify visual impact by adjusting contrast and brightness in your photos using mobile apps. Over “Contrast” and “Brightness” is equivalent to controlling not only the colors but also the lifespan of the photograph.

- Lowering the “Contrast” fades colors, giving the impression that the picture was taken a long time ago (as is observed in the left-hand side photo).
- Increasing the “Contrast” highlights the distinctive variance of the light and dark shades (as shown by the right-hand side image), making it look like a recently taken shot.
- “Brightness” is used to mellow down the extremities of “Contrast”; “Contrast” without “Brightness” gives an exaggerated visual. Therefore, increase or decrease the “Brightness” as required to get the desired color.
In the above example, “Contrast” is first increased; then the decrease in “Brightness” gives it just the right balance of color.
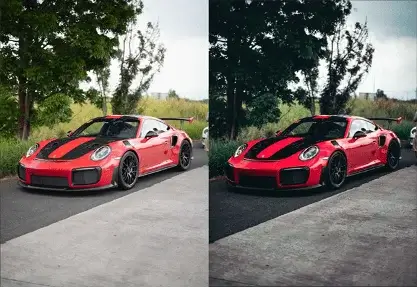
5. Shadows and lights:

Use mobile photo editing tools to enhance your photos by adjusting shadows and lights for captivating effects. On the one hand, sunlight acts as a natural lighting source; on the other hand, depending on the time of the day, it produces a highly darkened or lightened image.
Adjusting of the “Shadow” and “Light” bars to increase or decrease the hues of a darkened or lightened photo respectively can flawlessly correct them.
In this picture, the “Shadows” were decreased, followed by an increase in “Contrast” to emphasize the difference between the dark color of the car and the road and the light tint of the background.
6. Saturation:
Enhance colors effortlessly using your smartphone’s editing tools or third-party apps like Adobe Lightroom. Adjust the saturation for vibrant, eye-catching photos. As the name suggests, “Saturation” is the intensification of colors in a picture to bring about a vivifying vibrancy. Conversely, lowering the “Saturation” will remove colors from the image, reducing it to a dispirited black and white. Excessive saturation will produce unnatural hues, hence keep it in moderation.
In this photograph, “Saturation” was increased to just the right amount to enliven its visual, without going excessive which would have resulted in glaringly artificial colors.
7. Sharpness and texture:

Enhance sharpness and texture in your photos using simple adjustments in your favorite photo editing app. Experiment with intensity levels for colors and textures to create stunning visuals. Pictures taken from a mobile phone generally do not have the finest focus. Blurriness is a common issue and specific details may not even be registered.
- “Sharpness” accentuates the ‘lines’, thereby, magnifying details that normally would not be seen.
- “Texture” further amplifies the quality of the image by highlighting its texture.
Do not overdo them or apply them on very blurry photos as that would result in the opposite effect and make the picture look hideous.
8. Vignette:
When you activate this feature, your cell phone primarily applies the vignette effect, which involves adding blur or shadows around the photo’s edges. This effect enhances the focus on your desired point within the image, providing a professional touch to your edits.
Snapseed and Instagram rank as top choices, although mastering their features demands practice and time. However, other apps like VSCO, Adobe Spark, and PicsArt offer a similar variety of tools that users can easily handle without prior practice.
All of them provide straightforward functionality and users can smoothly navigate them on a cell phone, regardless of the app chosen. This makes photo editing much easier and more accessible, without compromising on quality.
As we conclude our exploration of mobile photo editing, it’s clear that the power to transform your images is at your fingertips. With the eight easy tricks shared in this article, you have the tools and knowledge to elevate your photography and unleash your creativity. Whether you’re a seasoned photographer or just starting, experimenting with editing apps like Snapseed and Instagram can open up new possibilities for your photos. And remember, if you ever need further assistance or want to explore professional photo editing services, don’t hesitate to reach out. The world of mobile photography is waiting for you to explore, so let your imagination soar and your images shine!
Still need any help?? Contact us in our live chat or message us for any guidance on Photo Editing or Retouching Services.


