Understanding Good Photography Angles for Fashion Photos
Taking fashion photos requires understanding the best angles to highlight clothing and accessories. Different angles serve different purposes and can enhance the overall appeal of your fashion images.
Choosing the Right Angles
Full-Length Shots
Full-length shots are crucial for showing the entire outfit, including shoes and accessories. Position the camera at the model’s eye level to avoid distortion. Ensure there’s enough space around the model to avoid cutting off any part of the outfit. This angle is often used in lookbooks and online stores to provide a comprehensive view of the attire. It’s important to keep the background simple so that the focus remains on the outfit. Natural light can enhance the colors and textures of the clothing.
Mid-Length Shots
Mid-length shots focus on the upper half of the body, typically from the waist up. These are perfect for highlighting tops, jackets, and accessories. The camera should be at the model’s chest level for a natural perspective. These shots are commonly used for fashion blogs and social media posts to emphasize details like fabric, patterns, and accessories. Use a moderate depth of field to blur the background slightly, which helps in drawing attention to the subject.
Close-Up Shots
Close-ups are used to capture intricate details like fabric texture, jewelry, and makeup. For close-ups, get up close and use a macro lens if possible. This angle is great for showcasing the craftsmanship of the clothing or the detail of accessories. Ensure good lighting to capture the details clearly. A shallow depth of field can help make the subject stand out by blurring the background significantly. This angle is particularly useful for e-commerce websites where detailed views of the product are essential for potential buyers.
Basic Editing Techniques for Beginners
Starting with basic editing techniques can significantly improve your fashion photos. Here are some essential tools and steps for beginners:
Essential Tools for Beginners
Cropping and Straightening
Cropping and straightening are fundamental edits that can enhance the composition of your photos. Use the crop tool to remove unnecessary parts of the image and improve its focus. Straightening helps in correcting tilted horizons, which can make the photo look more professional. In Photoshop, select the crop tool and adjust the edges. Use the grid overlay to help straighten the image. Cropping can also be used creatively to change the photo’s composition and draw more attention to the model.
Adjusting Brightness and Contrast
Brightness and contrast adjustments can make your photos more vibrant and appealing. Increasing brightness can help in lightening dark images, while adjusting contrast can make colors pop. In Photoshop, go to “Image” > “Adjustments” > “Brightness/Contrast.” Start with small adjustments to avoid over-editing. Brightness should enhance the visibility of the subject without washing out the colors. Contrast adjustments should add depth and dimension to the photo, making it look more dynamic.
Basic Color Correction
Color correction involves adjusting the colors to make them look more natural and balanced. This can include adjusting the white balance, saturation, and hue. In Photoshop, go to “Image” > “Adjustments” > “Color Balance” to fix any color cast. Start with the auto-correct feature and then fine-tune manually. Proper color correction ensures that the clothing and accessories are represented accurately, which is essential for fashion photography. It helps in maintaining the original color tones of the clothing, making them more appealing to viewers.
Advanced Fashion Photos Editing Techniques for Professionals
For those with more experience, advanced editing techniques can take your fashion photos to the next level. These techniques require a good understanding of Photoshop and its various tools.
Advanced Tools and Techniques
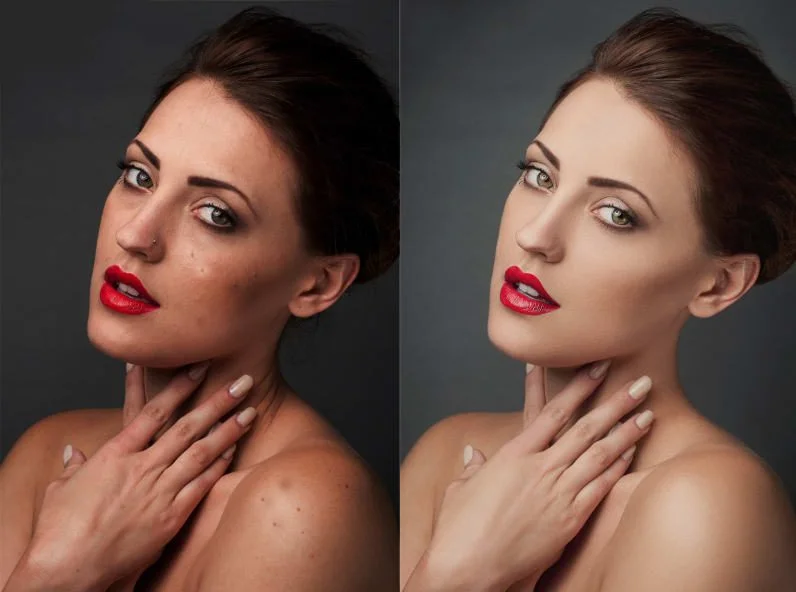
Frequency Separation
Frequency separation is a powerful technique for retouching skin while preserving its natural texture. It separates the image into high-frequency and low-frequency layers. The high-frequency layer contains the texture, while the low-frequency layer holds the color and tone. In Photoshop, duplicate the image layer twice. Apply a Gaussian Blur to the low-frequency layer and then use the “Apply Image” command on the high-frequency layer with the “Subtract” blending mode. This technique allows you to edit the skin texture and color separately, providing a smooth and natural look.
Dodge and Burn
Dodge and burn techniques involve lightening (dodging) and darkening (burning) specific areas to add depth and dimension. This technique is great for enhancing highlights and shadows, giving the image a more three-dimensional look. In Photoshop, create a new layer and set it to “Soft Light.” Use the dodge tool to lighten areas and the burn tool to darken areas. Adjust the brush size and opacity for more control. This technique can enhance the contours of the clothing and the model’s features, making the photo more striking.
Advanced Color Grading
Color grading involves adjusting the colors to create a specific mood or look. This can significantly impact the overall feel of the image. In Photoshop, use adjustment layers like “Color Balance,” “Hue/Saturation,” and “Curves.” Experiment with different settings to find the style that suits your photos best. Advanced color grading can make your photos look more professional and cohesive. It allows you to create a consistent color theme across a series of images, which is important for maintaining a brand’s visual identity.
Tips for Consistent and High-Quality Fashion Photos Editing
Maintaining a consistent and high-quality look in your fashion photos is crucial for building a recognizable brand. Here are some tips to achieve this:
Maintaining a Consistent Style
Using Presets
Presets are pre-defined settings that you can apply to your photos for a consistent look. Create your own presets in Lightroom or download them from other photographers. Apply the same preset to all your photos to maintain a cohesive style. Presets save time and ensure that your photos have a uniform appearance. They are especially useful for batch processing multiple photos from the same shoot.
Creating a Style Guide
A style guide outlines the editing process and specific settings you use. Document your editing steps and save them for future reference. This ensures that all your photos have the same look and feel. A style guide can include details about color correction, contrast levels, and any specific retouching techniques you use. This consistency is important for brand identity and helps in maintaining a professional portfolio.
Recommended Software for Fashion Images Editing
Different software offers various tools and features for fashion photo editing. Here are some of the best options:
Adobe Photoshop
Adobe Photoshop is the industry standard for photo editing. It offers a wide range of tools for both basic and advanced editing. From cropping and straightening to frequency separation and color grading, Photoshop has everything you need. Its extensive toolset allows for detailed and precise edits. Photoshop’s layers and masks offer unparalleled control over the editing process, making it the preferred choice for professional photographers.
Editing Fashion Images with Adobe Photoshop
Adobe Photoshop is a versatile tool for photo editing, offering a wide range of features that can help you achieve stunning results. Here’s how to use Photoshop to edit fashion photos.
Step 1: Open Your Image
- Open Adobe Photoshop.
- Go to
File > Openand select the photo you want to edit.
Step 2: Cropping and Straightening
- Select the Crop Tool from the toolbar or press
C. - Drag the corners of the crop box to include only the necessary parts of the image.
- Use the Straighten Tool (available within the Crop Tool) to correct any tilt by dragging a line along the horizon or a straight edge in the photo.
Step 3: Adjusting Brightness and Contrast
- Go to
Image > Adjustments > Brightness/Contrast. - Increase the Brightness slider to lighten the image.
- Adjust the Contrast slider to make the colors and details pop.
Step 4: Color Correction
- Go to
Image > Adjustments > Color Balance. - Adjust the sliders for Shadows, Midtones, and Highlights to balance the colors.
- Ensure the colors look natural and true to the original scene.
Step 5: Removing Blemishes and Imperfections
- Select the Spot Healing Brush Tool (shortcut:
J). - Click on blemishes, spots, or other small imperfections to remove them.
- For more control, use the Healing Brush Tool. Hold
Alt(Option on Mac) and click to sample a clean area, then paint over the imperfection.
Step 6: Frequency Separation
- Duplicate the background layer twice.
- Rename the first duplicate to “Low Frequency” and the second to “High Frequency”.
- Select the Low Frequency layer and go to
Filter > Blur > Gaussian Blur. Apply a blur that removes skin texture but retains color and tone. - Select the High Frequency layer, go to
Image > Apply Image, set Layer to “Low Frequency”, Blending to “Subtract”, Scale to 2, and Offset to 128. Change the layer mode to “Linear Light”. - Use the Clone Stamp Tool on the High Frequency layer to clean up texture without affecting color.
Step 7: Dodge and Burn
- Create a new layer and set it to Soft Light.
- Select the Dodge Tool to lighten areas and the Burn Tool to darken areas.
- Use a low exposure (10-20%) for subtle adjustments.
Step 8: Final Touches
- Review the image for any remaining imperfections.
- Use adjustment layers for final color grading and overall adjustments.
- Flatten the image and save your work.
Lightroom
Lightroom is great for organizing and editing large batches of photos. It offers powerful editing tools and presets that can be applied to multiple images at once. It’s ideal for photographers who need to edit quickly and efficiently. Lightroom’s non-destructive editing feature ensures that the original image remains untouched. Its cataloging system helps in keeping your photos organized, making it easier to find and edit specific images.
Editing Fashion Photos with Adobe Lightroom
Lightroom is perfect for batch processing and quick edits. Here’s how to use Lightroom to enhance your fashion photos.
Step 1: Importing Photos
- Open Lightroom and go to the Library module.
- Click on
Importand select the photos you want to edit.
Step 2: Cropping and Straightening
- In the Develop module, select the Crop Overlay tool (shortcut:
R). - Adjust the crop box and straighten the image using the angle slider.
Step 3: Adjusting Exposure and Contrast
- In the Basic panel, adjust the Exposure slider to correct the brightness.
- Increase the Contrast slider to add depth.
Step 4: White Balance and Color Correction
- Use the White Balance selector to set the correct white balance.
- Adjust the Temperature and Tint sliders for fine-tuning.
- Use the HSL/Color panel to adjust individual colors.
Step 5: Spot Removal
- Select the Spot Removal tool (shortcut:
Q). - Click on blemishes or spots to remove them. Use the Heal option for best results.
Step 6: Local Adjustments
- Use the Adjustment Brush, Graduated Filter, or Radial Filter for local adjustments.
- Adjust exposure, contrast, and other settings in specific areas.
Step 7: Final Adjustments
- Use the Tone Curve for more detailed contrast adjustments.
- Apply sharpening and noise reduction in the Detail panel.
- Sync settings across multiple photos if needed.
Step 8: Exporting
- Select your edited photos and go to
File > Export. - Choose your export settings and save the edited images.
Capture One
Capture One is known for its advanced color grading tools and excellent RAW file processing. It’s a favorite among fashion photographers for its precision and high-quality output. Capture One’s tethered shooting feature allows photographers to see the edits in real-time during a shoot. Its color editing tools provide more control and flexibility, making it possible to achieve a unique look.
Editing Fashion Photos with Capture One
Capture One is known for its color grading and RAW processing capabilities. Here’s how to use Capture One for fashion photo editing.
Step 1: Importing Photos
- Open Capture One and create a new session or catalog.
- Go to the Import dialog and select your photos.
Step 2: Basic Adjustments
- In the Exposure panel, adjust the exposure, contrast, and brightness.
- Use the High Dynamic Range tool to recover highlights and shadows.
Step 3: Color Balance and Correction
- Use the White Balance tool to set the correct white balance.
- Adjust the color balance and use the Color Editor for precise color adjustments.
Step 4: Spot Removal and Retouching
- Use the Spot Removal tool to remove blemishes and spots.
- For more detailed retouching, use layers and masks.
Step 5: Local Adjustments
- Use local adjustment layers for targeted edits.
- Apply adjustments to specific areas using masks.
Step 6: Advanced Color Grading
- Use the Color Balance tool for advanced color grading.
- Adjust the shadow, midtone, and highlight colors for a unique look.
Step 7: Final Adjustments
- Apply sharpening and noise reduction in the Details panel.
- Use the Output Proofing tool to see how the image will look in different formats.
Step 8: Exporting
- Go to the Output panel and set your export parameters.
- Export the edited images to your desired location.
Common Mistakes to Avoid
Avoiding common mistakes can save you time and improve the quality of your photos. Here are some pitfalls to watch out for:
Over-editing
Over-editing can make your photos look unnatural. Use subtle adjustments to enhance your images without going overboard. It’s important to maintain the natural look of the clothing and the model. Over-editing can result in loss of details and make the photo look artificial. Always compare the edited photo with the original to ensure that you haven’t overdone it.
Ignoring the Background
A distracting background can take away from the main subject. Always check the background and remove any unwanted elements. A clean and simple background ensures that the focus remains on the clothing and the model. Use the clone stamp or healing brush tool in Photoshop to remove distractions. Consider using a plain backdrop during the shoot to minimize post-processing work.
Inconsistent Edits
Inconsistent edits can make your photo set look disjointed. Maintain a consistent style by using presets and following a style guide. Consistency is key in fashion photography as it helps in creating a cohesive look. Ensure that all photos in a series have the same color balance, contrast levels, and retouching style. This consistency is important for professional presentations, portfolios, and social media feeds.


